In addition, it needs to be very easy to clean and also inhibit odor. A professional bathroom remodeling contractor will offer mixed tips regarding which option is best for the new building in the home of yours. When you're looking for a bathroom floor information which is reasonable, attractive and easy on bare feet, you should develop a beeline for ceramic.
Images about Bathroom Floor Tiling Instructions
:no_upscale()/cdn.vox-cdn.com/uploads/chorus_asset/file/19496978/howto_tile_01.jpg)
Wood, bamboo, cork, laminates or maybe vinyl aren't the optimal flooring selections for your bath room. Decoration is generally the crucial to achieving this, and by far the most critical elements of any bathroom is using the appropriate flooring. Bamboo and cork is able to retain moisture and they are able to become thriving justification for other microorganisms and bacteria.
How to Lay Tile: Install a Ceramic Tile Floor In the Bathroom (DIY)

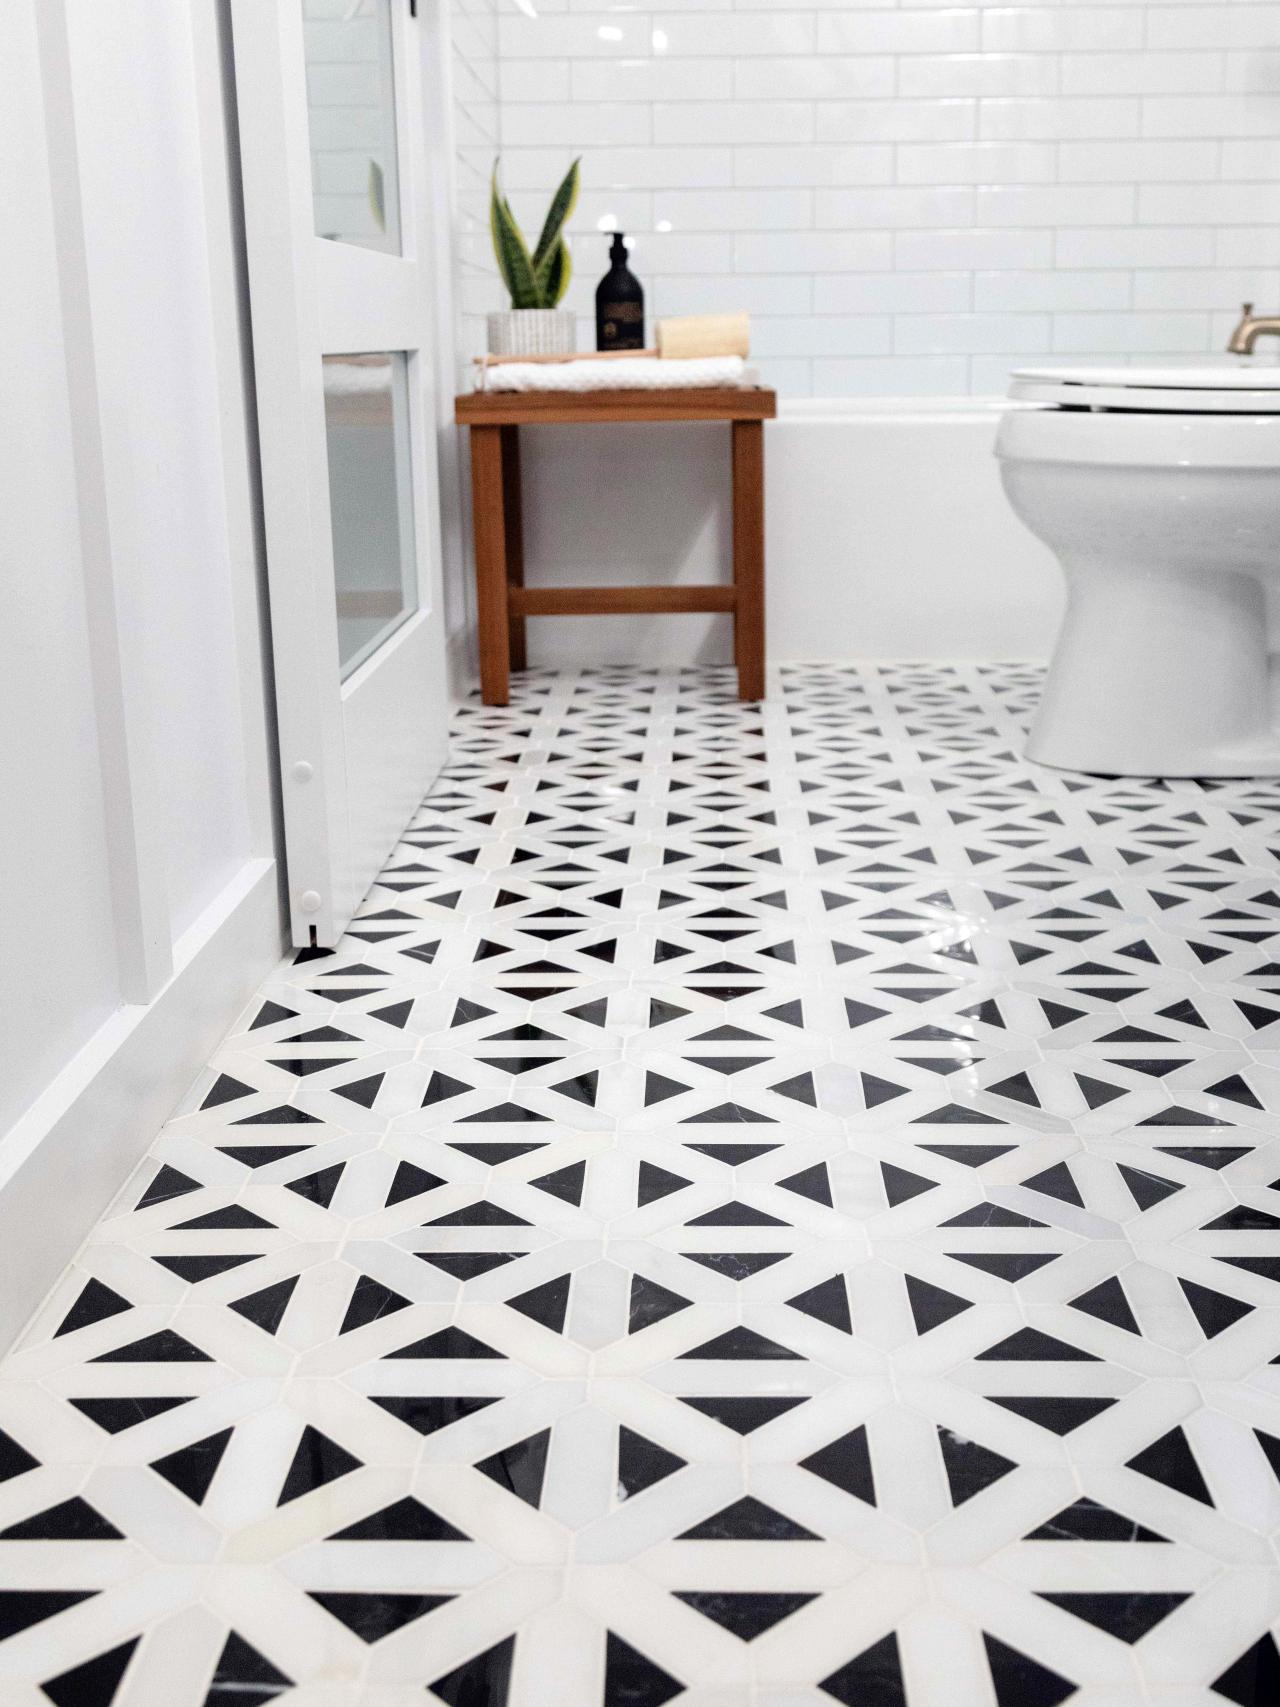
If perhaps you've decided to use bathroom floor ceramic, choose ones which blend in with the decor of the bath room. Appealing bathroom flooring ceramic flooring combines with a bit of resourcefulness and imagination can work wonders for the overall look as well as ambiance of the home. The greatest part about bathroom floor ceramic tiles is they suit virtually any sort of decor.
How to Lay Tile: Install a Ceramic Tile Floor In the Bathroom (DIY)

How to Tile a Bathroom Floor with Wickes

How to Lay a Tile Floor HGTV

How to Tile a Small Bathroom Floor DIY Bath Remodel

How to Lay Tile: DIY Floor Tile Installation Loweu0027s

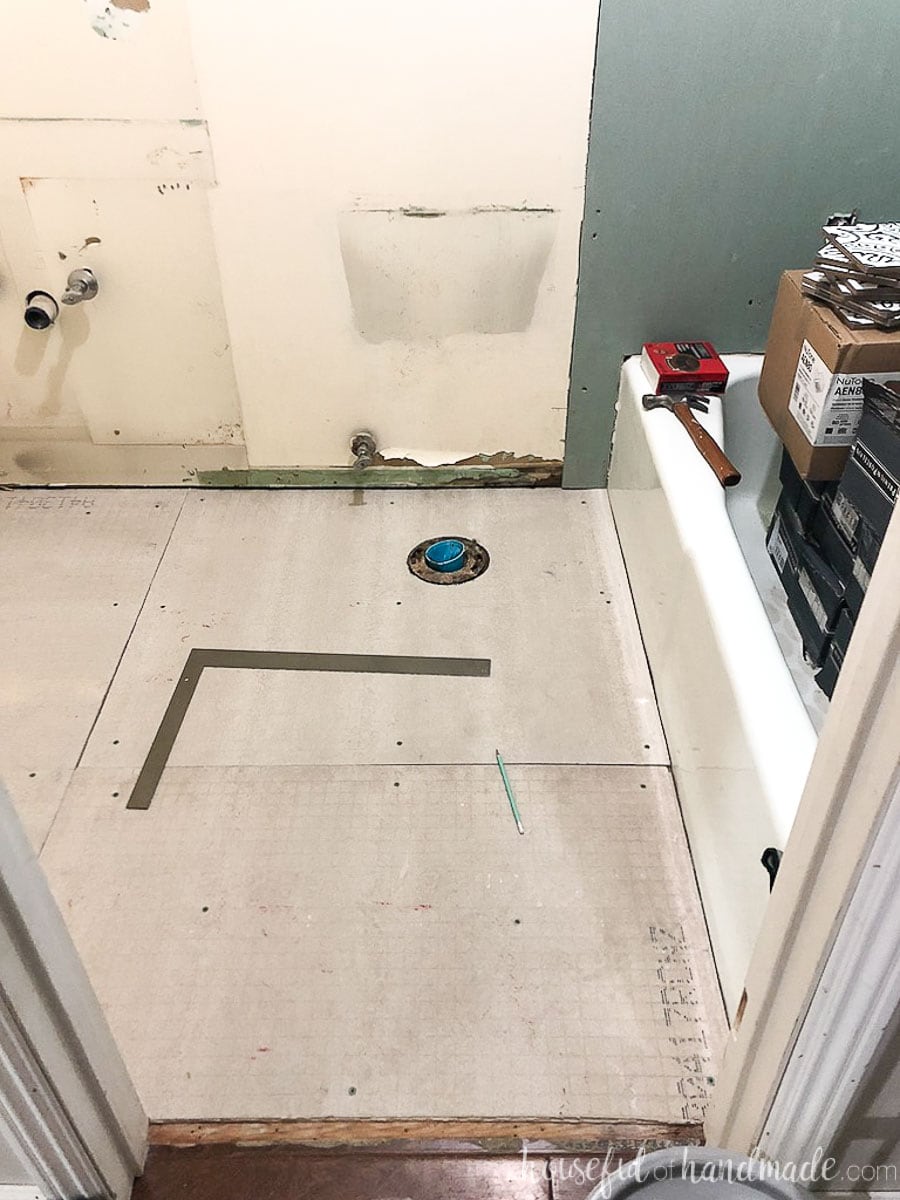
Laying Floor Tiles in a Small Bathroom – Houseful of Handmade
How To Tile a Bathroom Floor The Home Depot

How to Tile a Bathroom Floor
/BathroomTileFloor-092a6b5be9a843e69b583431fa59c5d7.jpg)
How to Lay Tile: Install a Ceramic Tile Floor In the Bathroom (DIY)
How to Lay a Tile Floor HGTV
How to Lay Tile: DIY Floor Tile Installation Loweu0027s
How to Tile a Bathroom Floor A DIY Guide Mr. Fix It DIY

Related Posts:
- Bathroom Floor Tile Patterns Ideas
- Black And White Bathroom Floor Designs
- Bathroom Epoxy Floor Coating
- Bathroom Floor Covering Options
- His And Hers Bathroom Floor Plans
- Dark Wood Tile Floor Bathroom
- Handicap Bathroom Floor Plans Commercial
- How To Clean Grout In Bathroom Floor
- Bathroom Flooring Wood Look
- Bathroom Floor Tile Layout 12×24
Bathroom Floor Tiling Instructions: A Step-by-Step Guide to Transforming Your Space
Introduction:
When it comes to renovating your bathroom, one of the most impactful changes you can make is updating the flooring. A new tile floor not only adds aesthetic appeal but also enhances durability and functionality. However, tiling a bathroom floor may seem like a daunting task for many homeowners. Fear not! In this comprehensive guide, we will walk you through the step-by-step instructions to help you achieve a professional-looking tiled bathroom floor.
Preparation:
Before diving into the tiling process, it is crucial to prepare your bathroom floor properly. This involves removing any existing flooring, ensuring a clean and level surface, and gathering the necessary tools and materials.
1. Remove Existing Flooring: Start by removing any existing flooring materials like vinyl or carpet. Use a pry bar to lift up the edges and gradually work your way across the entire floor. Be cautious not to damage the subfloor during this process.
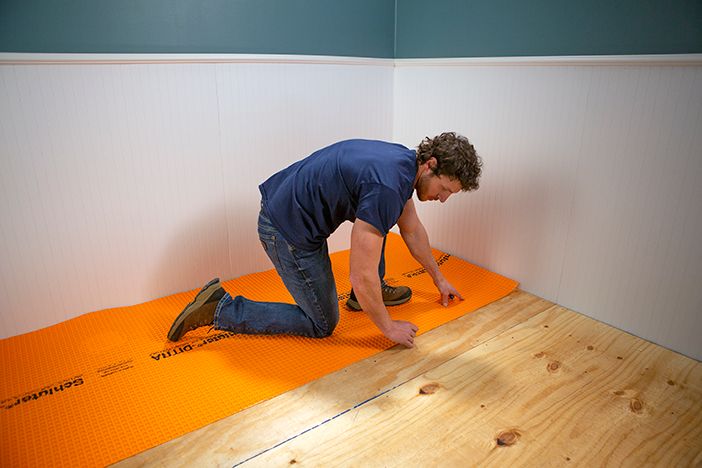
2. Clean and Level the Subfloor: Once the old flooring is removed, thoroughly clean the subfloor with a broom or vacuum cleaner to remove any debris or dust. Next, inspect for any imperfections or unevenness in the subfloor. Fill in any gaps or low spots with a self-leveling compound and allow it to dry according to the manufacturer’s instructions.
3. Gather Tools and Materials: To ensure a smooth tiling process, gather all the necessary tools and materials beforehand. These typically include ceramic or porcelain tiles, tile adhesive, spacers, grout, a trowel, a tile cutter or wet saw, a spirit level, a rubber mallet, tile spacers, grout float, sponge, and safety equipment such as goggles and gloves.
Installing Bathroom Floor Tiles:
Now that you have prepared your bathroom floor adequately let’s dive into the actual tiling process step-by-step.
1. Determine the Tile Layout: Before applying any adhesive, determine the layout of your tiles. Start by finding the center point of the room and mark it. This will serve as a starting point for laying your tiles. Dry-fit some tiles in different directions to create a visually pleasing pattern.
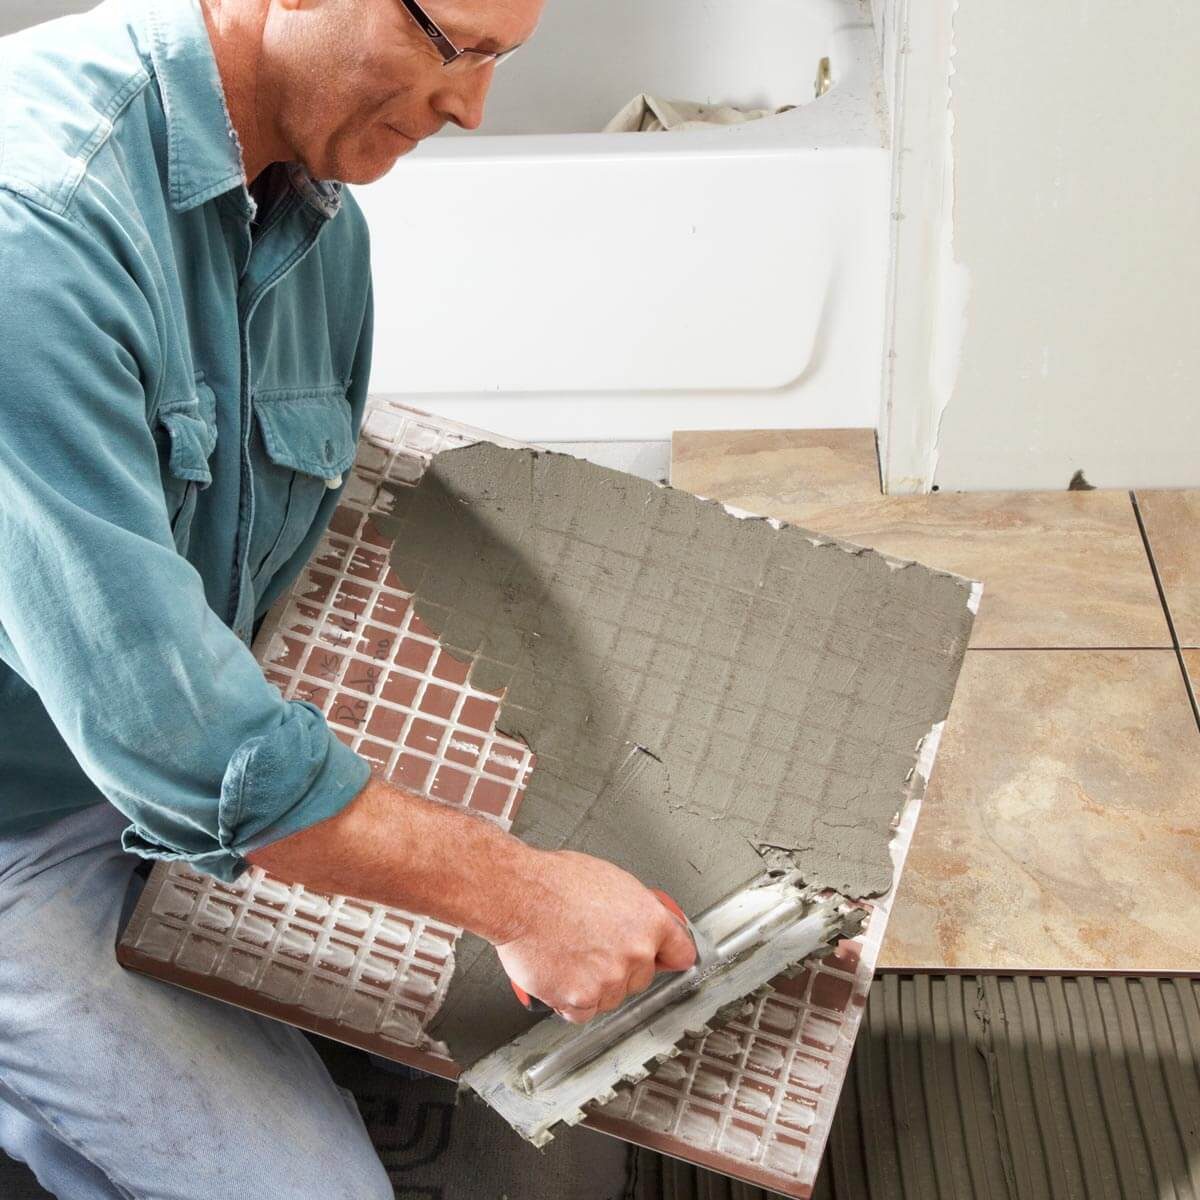
2. Apply Tile Adhesive: With your layout in mind, begin applying tile adhesive using a notched trowel. Start at the center point and work your way outwards, covering a small area at a time to ensure the adhesive doesn’t dry before you can lay the tiles. Hold the trowel at a 45-degree angle to create grooves in the adhesive, which will enhance tile adhesion.
3. Lay Tiles: Carefully place the first tile at the center point and press it into the adhesive, giving it a slight twist to achieve proper contact. Continue adding tiles, following your predetermined layout and using tile spacers to maintain consistent gaps between each tile. Use a spirit level to ensure they are level and adjust if necessary.
4. Cut Tiles as Needed: Inevitably, you’ll come across areas where full tiles won’t fit perfectly. For these sections, measure and mark the required dimensions on a tile and use a tile cutter or wet saw to make precise cuts. Remember to wear safety goggles and follow manufacturer instructions when using cutting tools.
5. Grouting: Once all the tiles are laid and adhesive has dried according to manufacturer guidelines, it’s time to grout the joints between them. Prepare grout according to package instructions and use a grout Float to apply it to the joints, ensuring that all gaps are filled. Remove excess grout with a damp sponge before it dries. Allow the grout to cure for the recommended time before proceeding.
6. Clean and Seal: After the grout has fully cured, clean the tiles with a damp sponge to remove any remaining grout residue. Once the tiles are clean and dry, apply a tile sealer to protect them from stains and water damage. Follow the manufacturer’s instructions for application and drying times.
7. Finishing Touches: Finally, install any necessary transition strips or thresholds to create a seamless transition between your newly tiled bathroom floor and adjacent flooring surfaces. Trim any excess grout or adhesive that may be visible along the edges of the tiles.
Remember to allow adequate drying time for all materials used during the tiling process before using the bathroom floor. With proper preparation and attention to detail, you can achieve a beautiful and durable tiled bathroom floor that will enhance the overall appearance of your space.
Can you lay bathroom floor tiles over existing tiles?
Yes, it is possible to lay bathroom floor tiles over existing tiles. However, there are a few important factors to consider before doing so:1. Tile Condition: Ensure that the existing tiles are in good condition and properly adhered to the floor. Any loose or damaged tiles should be removed or repaired before installing new tiles.
2. Height and Accessibility: Adding another layer of tiles will raise the floor level, so check if this will affect door clearances or cause any issues with other fixtures such as toilets or vanities. Also, ensure that the additional height does not create tripping hazards.
3. Tile Adhesion: Proper adhesion is essential for a long-lasting result. Make sure the surface of the existing tiles is clean, dry, and free from any dirt, grease, or wax. To enhance adhesion, it is recommended to roughen the surface of the existing tiles using sandpaper or applying a bonding primer.
4. Tile Selection: Consider the thickness of the new tiles and whether they will align well with other adjacent flooring surfaces (e.g., hallway or adjoining rooms), especially if transitioning between different flooring materials.
5. Grout Lines: The existing grout lines may telegraph through the new tiles, so it’s important to ensure they are clean and flat. If necessary, apply a leveling compound or skim coat to create a smooth surface.
It’s always best to consult with a professional tile installer before proceeding to ensure that all necessary steps are followed for a successful installation.