The advantages that one can get through the polished concrete floors are very numerous and several of them include the point that the polished concrete floors present a genuine very low-cost solution to the notion of flooring as well as giving a good option in conditions of environmentally friendly options.
Images about Fixing Sole Plate To Concrete Floor
to be able to change the color of the floor, buyers may request shake-on color hardeners or even penetrating synthetic stains and dyes to alter their grey colored concrete to any kind of range of styles. Lately which has changed as increasingly more folks are realizing that a polished concrete floor really looks great. Polished concrete flooring looks much more slippery than it’s.
Attaching bottom stud plate to slab Contractor Talk
In fact concrete floors are not new stuff, however these were constantly around. Among the reasons concrete polishing floors are rising in demand is as they eliminate additional costs that may be the case with a new build. Below are actually a number of the positives to building the new home of yours with floors of polished concrete or even exposing the concrete floor of your current home.
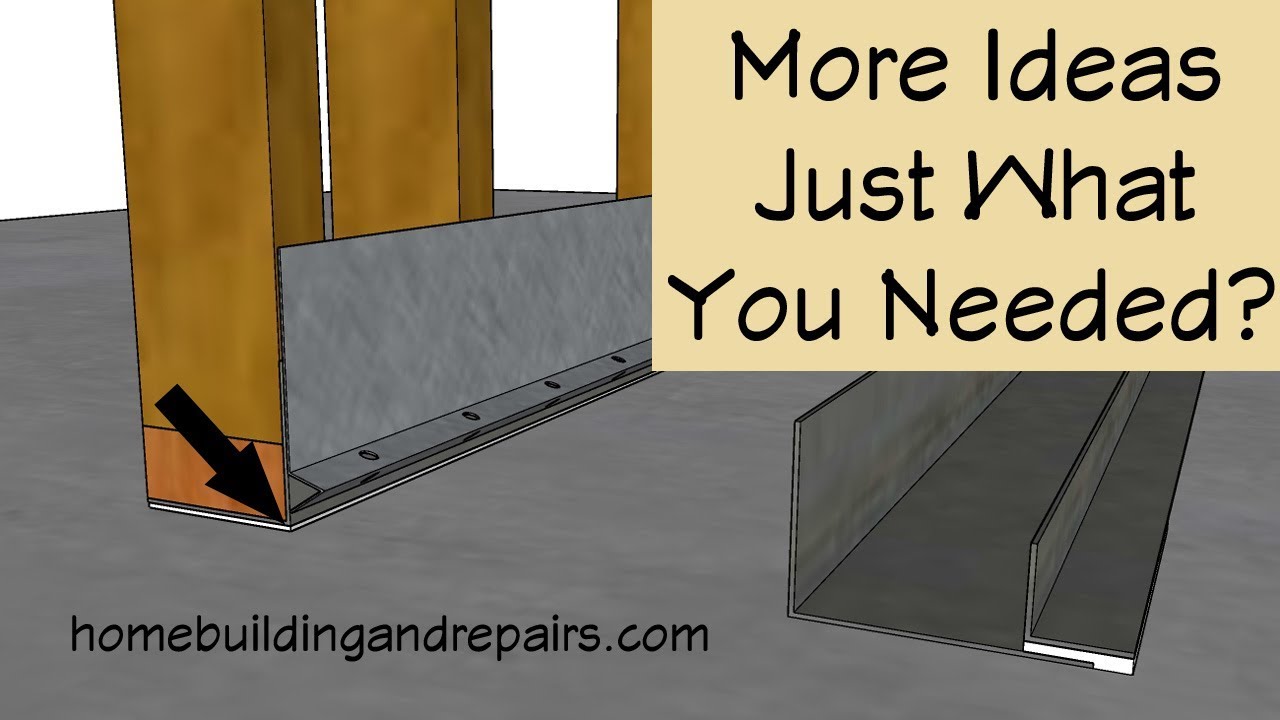
Ideas for Sealing the Bottom of a Wall Framing Plate Sitting on Top of Concrete Slab
Screw-type anchors for bottom plates BRANZ Build

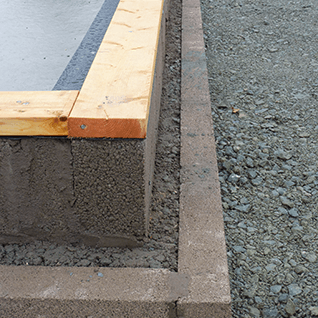
The builders fit the soleplate – Build It
Anchoring walls to concrete pad
7 Ways to Fasten an Interior Wall to Concrete for a Secure Hold

Screw-type anchors for bottom plates BRANZ Build

Drop the right anchor! – PlaceMakers
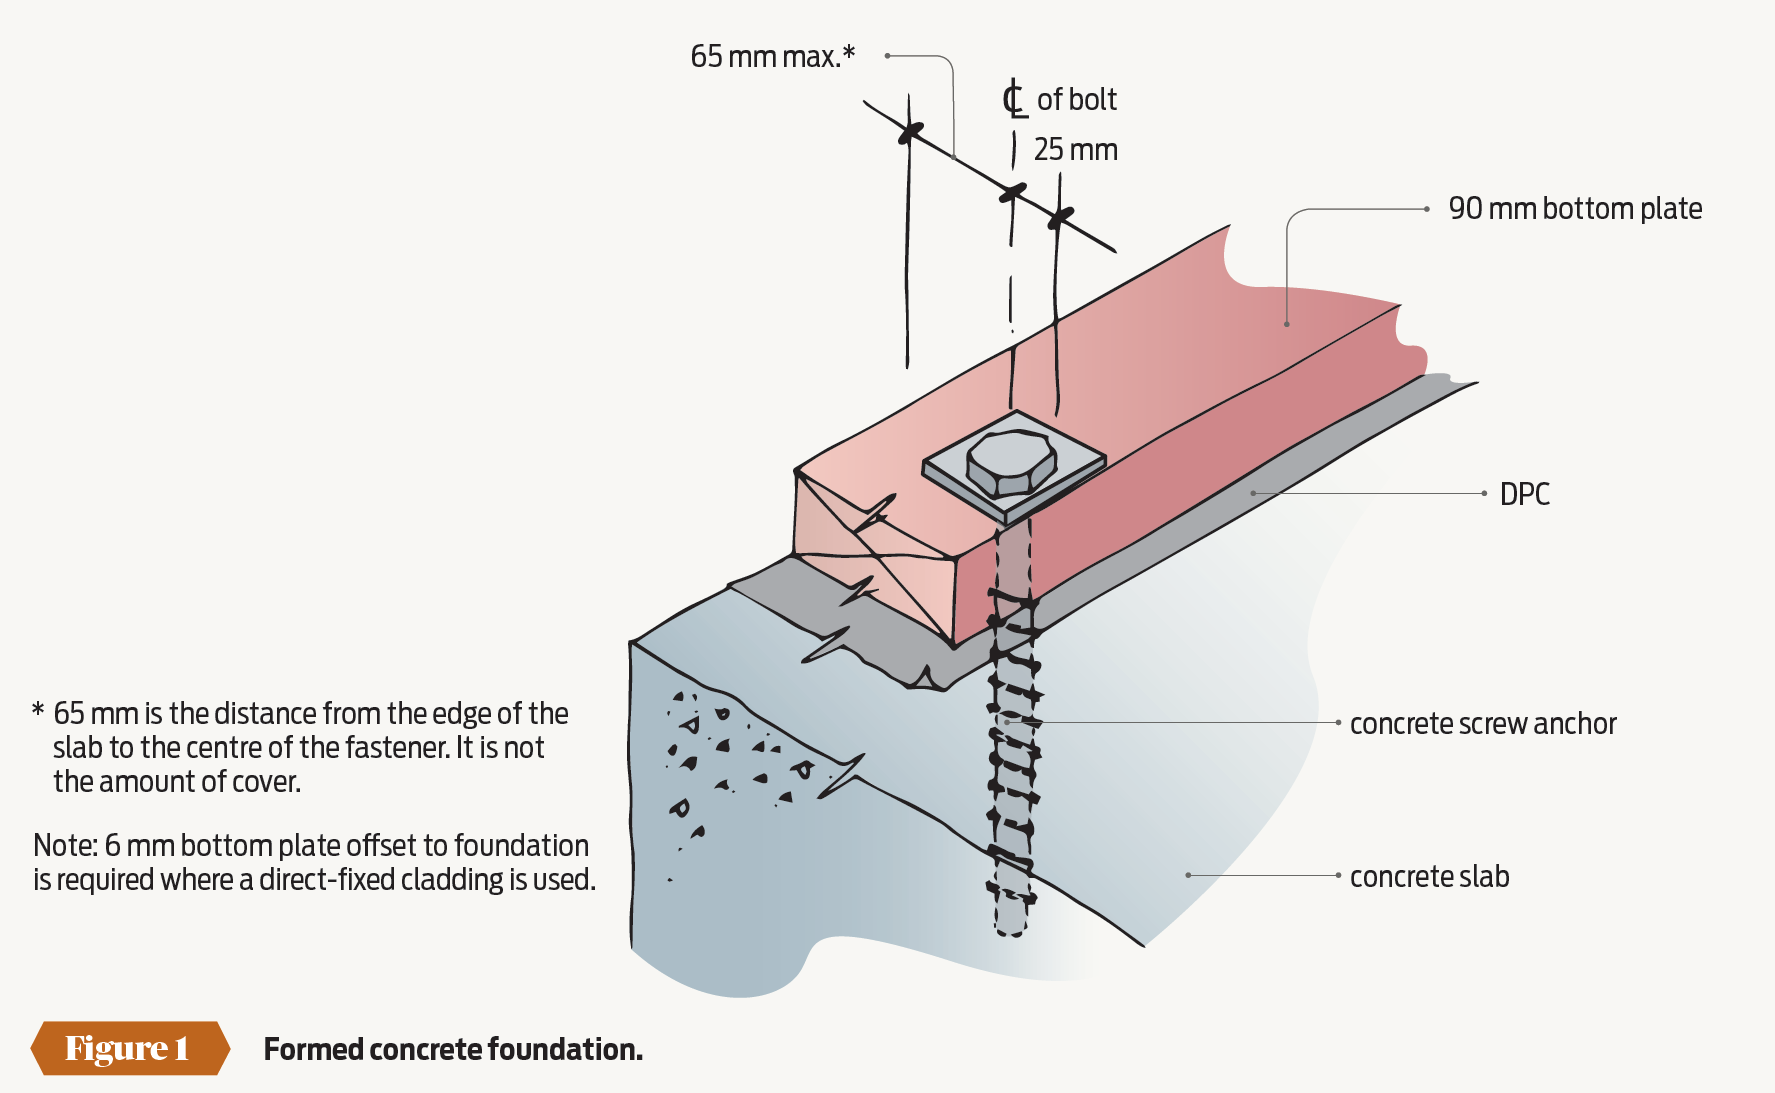
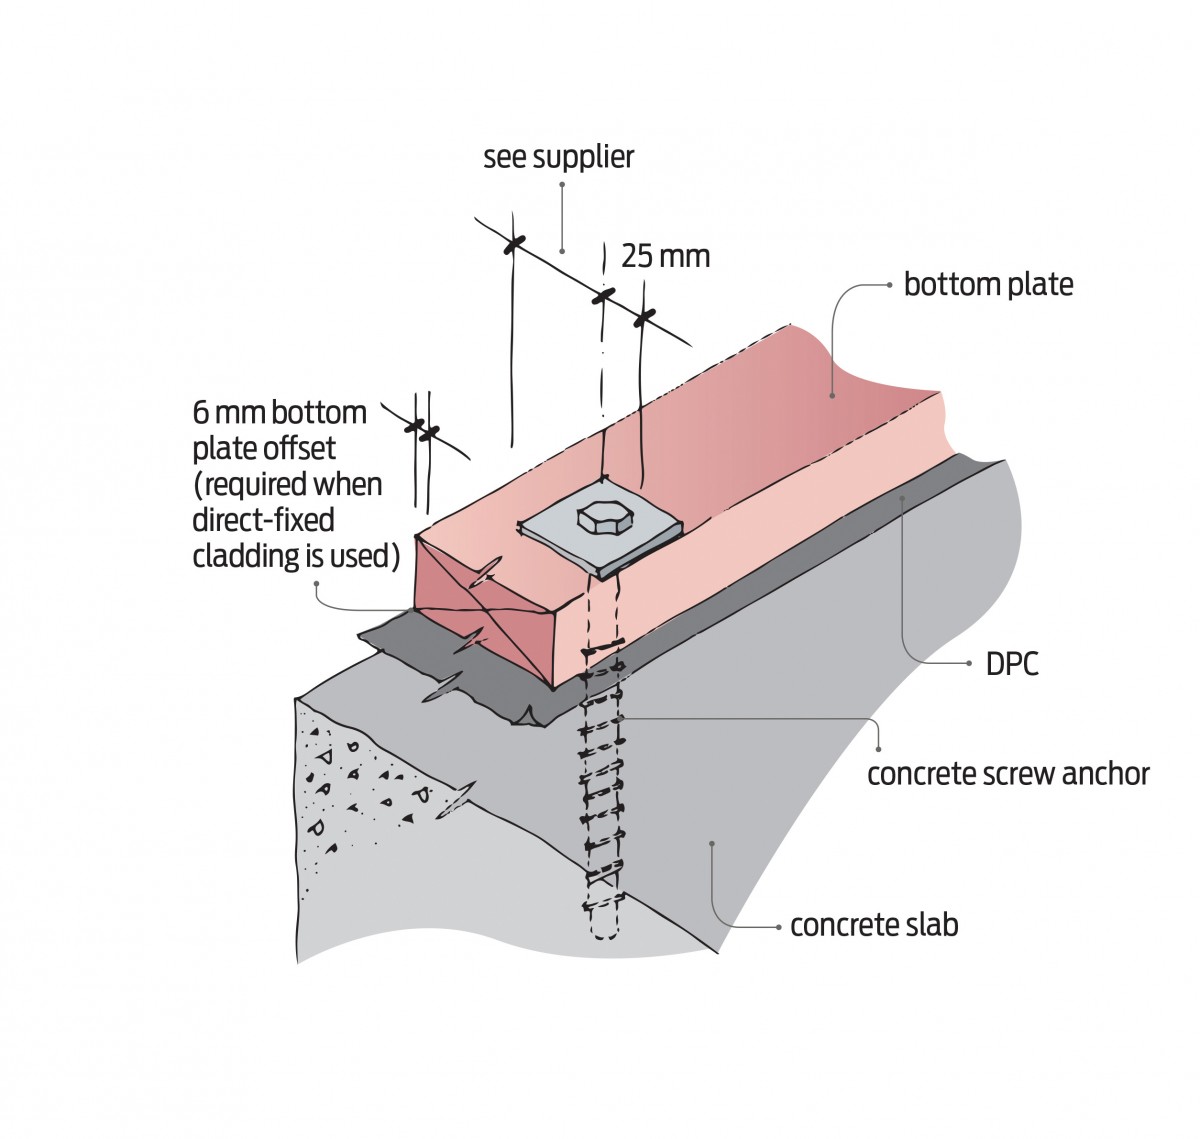
Bottom plate anchors BRANZ Build

Garage to Workshop Conversion – Phase 4 details
Essential anchors for bottom plates – PlaceMakers
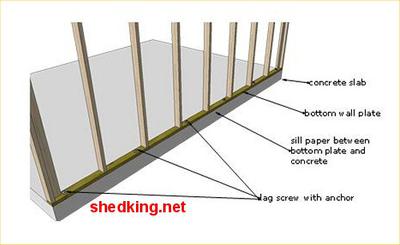
How To Layout Shed Walls On Concrete and Drill Wall Bottom Plates.

Related Posts:
- Behr Epoxy Concrete Floor Paint
- Concrete Floor Preparation For Wood Flooring
- Epoxy Paint For Concrete Floors Colors
- Rent Concrete Floor Cleaner
- Heated Concrete Floor Tubing
- Concrete Floor Staining Process
- Concrete Floor Interior Design
- Concrete Floors In Your Home
- Cost Of Poured Concrete Floor
- Outdoor Polished Concrete Floors
Understanding the Importance of Properly Securing the Sole Plate
Securing the sole plate to a concrete floor might seem like a minor detail in construction, but it plays a crucial role in the structural integrity of a building. The sole plate, typically made of wood or metal, serves as the base for framing walls and distributing the load of the structure evenly. Properly securing it ensures that the walls are stable and resistant to various forces like wind, seismic activity, and the weight of the building itself.
One of the primary reasons for securely fixing the sole plate is to prevent any movement or shifting of the walls over time. Even minor shifts can lead to significant structural issues, compromising the safety and stability of the entire building. Additionally, a properly secured sole plate helps in maintaining the alignment and straightness of the walls, which is essential for the overall aesthetics and functionality of the structure.
Preparing the Concrete Floor for Sole Plate Installation
Before installing the sole plate on a concrete floor, proper preparation is key to ensuring a secure and long-lasting attachment. Here are some essential steps to follow:
-
Clean the Surface: Start by thoroughly cleaning the concrete surface where the sole plate will be installed. Remove any debris, dirt, or oil stains that could affect the bonding of the sole plate to the concrete.
-
Inspect for Cracks or Damage: Examine the concrete floor for any cracks or damage that may compromise the installation. Repair any cracks using an appropriate concrete patching compound and allow it to cure completely before proceeding.
-
Moisture Barrier: Depending on the climate and location, consider installing a moisture barrier to prevent water infiltration from the concrete into the sole plate. This barrier can be a sheet of plastic or a specialized membrane designed for this purpose.
-
Mark Anchor Locations: Determine the placement of anchor bolts or other fasteners along the sole plate and mark their locations on the concrete floor. Ensure proper spacing according to building codes and structural requirements.
-
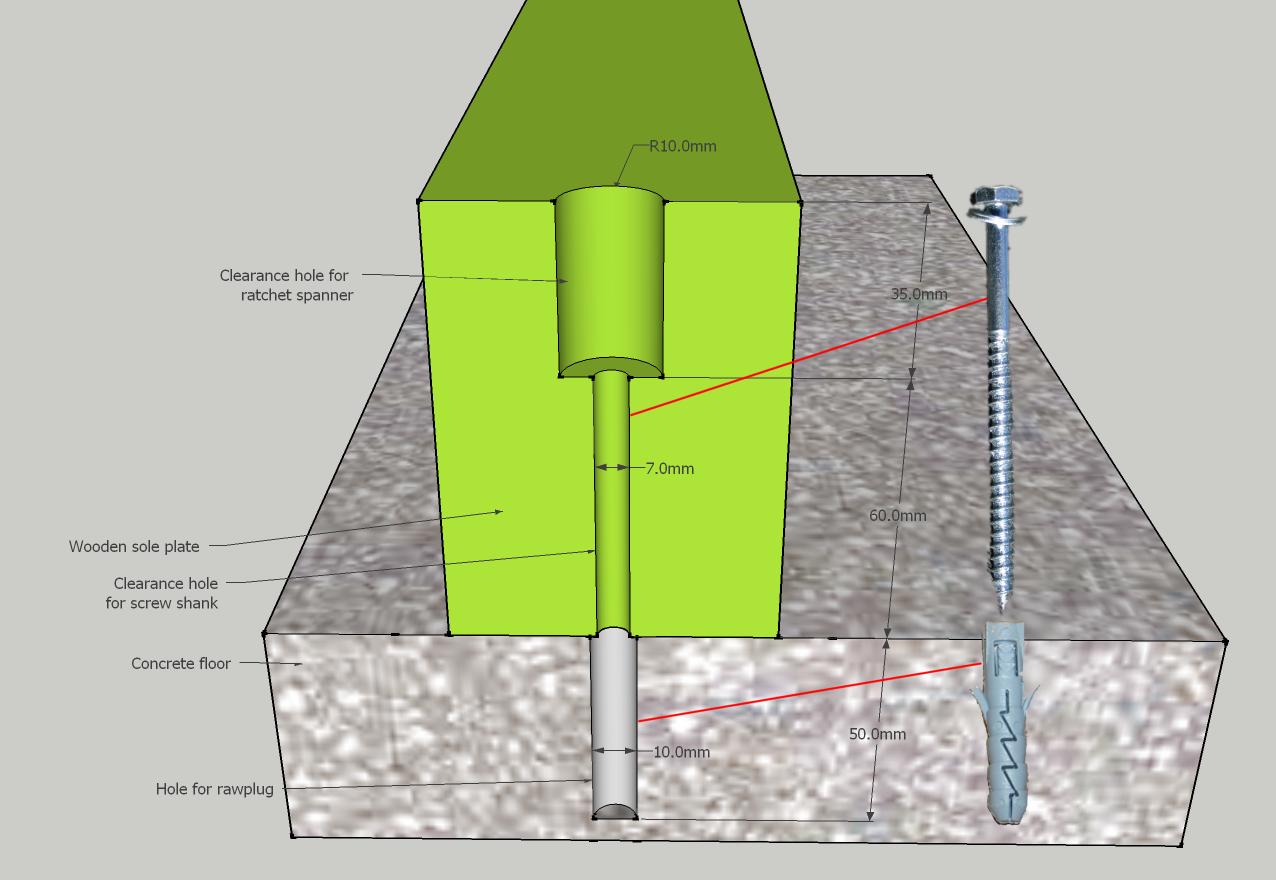
Drilling Holes: Use a hammer drill equipped with a masonry bit to drill holes into the concrete at the marked locations for the anchor bolts. The size of the drill bit should match the diameter of the bolts being used.
-
Clean and Prime Holes: After drilling, clean out the holes to remove any dust or debris. Apply a concrete bonding agent or primer to the holes to improve the adhesion of the anchor bolts to the concrete.
Methods for Fixing Sole Plate to Concrete Floor
Several methods can be used to fix the sole plate to a concrete floor, each with its advantages and considerations. Here are some common methods employed in construction:
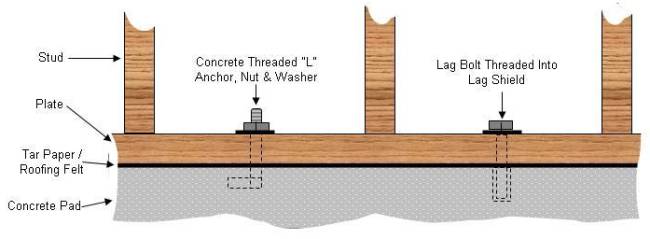
Anchor Bolts: This is perhaps the most traditional and widely used method for securing a sole plate to a concrete floor. Anchor bolts are inserted into pre-drilled holes in the concrete and secured with nuts and washers. They provide strong, reliable support and are relatively easy to install.
Concrete Screws: Concrete screws offer a convenient alternative to anchor bolts, especially for lighter framing applications. These screws are designed specifically for use in concrete and feature a threaded design that provides excellent holding power. They are installed using a power drill equipped with a masonry bit and require no additional anchors or expansion mechanisms.
Adhesive Anchors: Adhesive anchors, also known as epoxy anchors, involve the use of epoxy resin to bond the sole plate directly to the concrete floor. This method offers excellent strength and reliability, particularly in applications where drilling may be challenging or where aesthetics are a concern. However, proper surface preparation and application are critical for ensuring a successful bond.
Powder-Actuated Fasteners: Powder-actuated fastening systems use a gunpowder charge to drive specialized nails or pins into the concrete. These fasteners provide quick and easy installation, making them suitable for high-volume construction projects. However, they require proper training and caution to use safely, as misuse can lead to damage or injury.
Expansion Anchors: Expansion anchors, such as wedge anchors or sleeve anchors, rely on mechanical expansion to secure the sole plate to the concrete. They are inserted into pre-drilled holes and expanded using a wrench or hammer, creating a tight fit. These anchors offer strong holding power and are suitable for heavy-duty applications.
Tips and Best Practices for a Secure Installation
Ensuring a secure installation of the sole plate to a concrete floor requires attention to detail and adherence to best practices. Here are some tips to help you achieve a reliable and long-lasting attachment:
Use High-Quality Materials: Invest in high-quality sole plates, fasteners, and other materials to ensure durability and reliability. Cheap or inferior materials may compromise the integrity of the installation and lead to issues down the line.
Follow Manufacturer Recommendations: Always follow the manufacturer’s instructions and recommendations for the installation of sole plates and fastening systems. This includes proper drilling techniques, torque specifications, and curing times for adhesives.
Ensure Proper Alignment: Before securing the sole plate, double-check that it is aligned correctly with the layout of the walls and any adjacent structures. Misalignment can lead to uneven loads and structural issues.
Apply Adequate Fasteners: Use the appropriate number and type of fasteners to secure the sole plate according to building codes and structural requirements. Avoid over-tightening, which can cause damage to the fasteners or the concrete.
Inspect for Tightness: After installation, inspect the fasteners to ensure they are tightened securely. Periodically check for any signs of loosening or movement, especially in high-stress areas or extreme weather conditions.
Consider Expansion Joints: In larger structures or areas prone to temperature fluctuations, consider incorporating expansion joints into the sole plate installation to accommodate movement and prevent cracking.
Troubleshooting Common Issues and Ensuring Long-Term Stability
Even with careful planning and execution, issues may arise during or after the installation of the sole plate to a concrete floor. Here are some common problems to watch out for and how to address them:
Uneven Surface: If the concrete floor has uneven or irregular surfaces, it can affect the alignment and stability of the sole plate. Consider using shims or leveling compounds to create a flat and stable base for installation.
Cracked Concrete: Cracks in the concrete can compromise the integrity of the installation and lead to further damage over time. Repair any cracks using an appropriate patching compound before proceeding with the sole plate installation.
Loose Fasteners: Over time, fasteners may become loose due to settling, vibrations, or other factors. Periodically inspect the fasteners and tighten them as needed to maintain a secure connection between the sole plate and the concrete floor.
Moisture Damage: Excessive moisture can weaken the bond between the sole plate and the concrete, leading to instability and decay. Ensure proper drainage and consider installing a moisture barrier or waterproofing membrane to protect against moisture damage.
Termite Infestation: Termites pose a significant threat to wooden structures, including the sole plate. If left unchecked, termites can cause extensive damage, compromising the structural integrity of the building. To prevent termite infestations, consider treating the wood with a termite-resistant treatment or using pressure-treated lumber for the sole plate. Additionally, regularly inspect the structure for signs of termite activity, such as mud tubes, wood damage, or discarded wings, and take prompt action to address any infestations.
Inadequate Support: Insufficient support for the sole plate can lead to sagging or instability in the walls, especially in load-bearing areas. Ensure that the sole plate is adequately supported by the foundation or subfloor below, using appropriate joists or beams as needed. Reinforce areas with heavy loads or spans to prevent structural issues over time.
Improper Installation: Mistakes during the installation process can compromise the stability and safety of the structure. Common errors include using incorrect fasteners, inadequate spacing, or insufficient anchoring depth. If you encounter any installation issues, consult with a structural engineer or construction professional to assess the situation and determine the appropriate corrective measures.
Seismic Considerations: In earthquake-prone regions, it’s essential to consider seismic design principles when fixing the sole plate to a concrete floor. Use seismic anchors, hold-downs, or other specialized fasteners to provide additional resistance to lateral forces during an earthquake. Follow local building codes and regulations to ensure compliance with seismic requirements and enhance the resilience of the structure.
Long-Term Maintenance: Even after the initial installation, ongoing maintenance is crucial for ensuring the long-term stability and durability of the sole plate attachment. Regularly inspect the structure for signs of wear, damage, or deterioration, and address any issues promptly to prevent further damage or structural failure. Implement a comprehensive maintenance plan that includes inspections, repairs, and preventative measures to extend the lifespan of the structure and ensure its continued safety and stability.