Modern day technology has the capability to create the ordinary vinyl flooring of yours straight into a luxurious one. The process used to imprint the pattern of the flooring can imitate a lot of patterns including wood grain, tile, marble and stone. Vinyl flooring is available in several forms. You can even have vinyl flooring with wood style in your basement or bathroom, regions which are a clear no-no for wood floors because of the closeness of theirs to water.
Images about How To Lay Vinyl Floor Tiles Around A Toilet
Resilient vinyl flooring is really versatile because it is currently made to simulate the overall look of numerous natural substrates. With a minimal amount of tender interested care, the sleek new floor of yours will be in mint condition for years to come. Your arms and hands are going to be extremely grateful you did. In this article we are going to discuss several of these items to assist you determine whether they are a suitable choice for the home of yours.
4 Ways to Cut Tile Around a Toilet – wikiHow

Vinyl may be used for a foyer, office, kitchen, living room, bathroom, and another room. Use inlaid vinyl flooring for heavy traffic areas like shopping centers, offices and schools. This means it could be installed over uneven floors and does not require a backing material to soak the feet of yours from becoming exhausted. It's the 2nd layer of vinyl flooring which makes it really gorgeous and flexible.
How to lay vinyl floor in a bathroom Dove Cottage
How to easily install vinyl flooring around a toilet
How to lay vinyl floor in a bathroom Dove Cottage
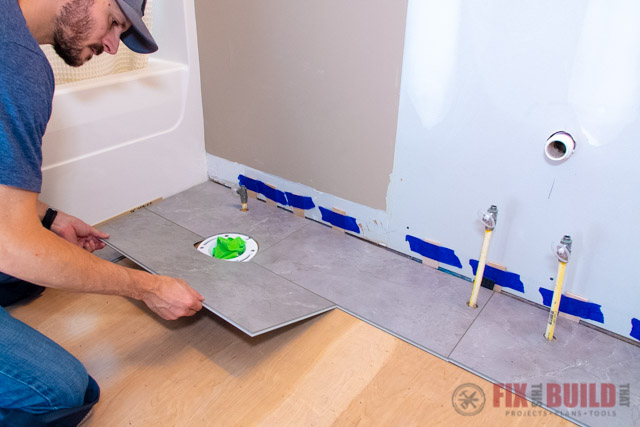
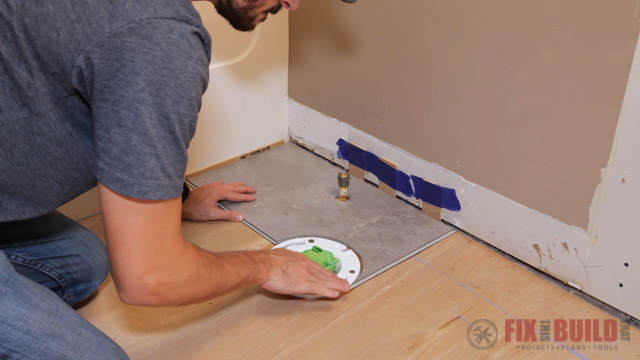
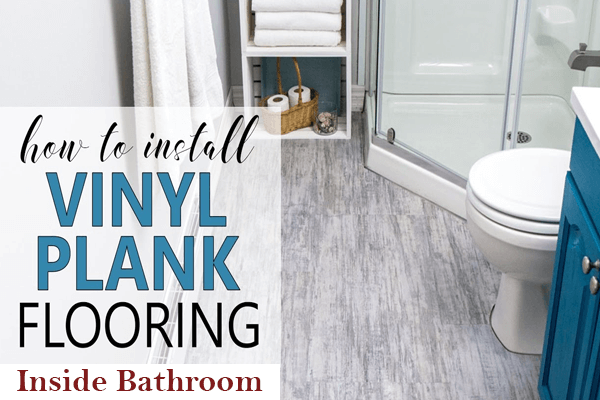
How to Install Vinyl Plank Flooring in a Bathroom FixThisBuildThat
How to install laminate around a toilet and other round shapes

Installing Vinyl Plank Flooring In Bathroom Cutting Around Toilet

How to lay vinyl floor in a bathroom Dove Cottage
4 Ways to Cut Tile Around a Toilet – wikiHow

Can You Put Vinyl Plank Under/Around Vanity/Toilet/Bathtub – Ready
How to Install Vinyl Plank Flooring in a Bathroom FixThisBuildThat
How To Install Floating Vinyl Plank Flooring In A Bathroom: 6 Step
Quick and Easy Bathroom Floor Update Vinyl flooring bathroom

Related Posts:
- Vinyl Flooring Manufacturing Companies
- How To Clean Vinyl Flooring That Looks Like Wood
- Ez Fit Vinyl Flooring Reviews
- Crystal Vinyl Flooring
- Luxury Vinyl Flooring Denver
- Marble Look Sheet Vinyl Flooring
- Orion Vinyl Flooring
- Water Under Vinyl Flooring Concrete
- Lumber Liquidators Vinyl Flooring Formaldehyde
- Transition Strip Between Carpet And Vinyl Flooring
Title: Mastering the Art of Laying Vinyl Floor Tiles Around a Toilet
Introduction:
Vinyl floor tiles are an excellent choice for bathroom flooring due to their durability, water resistance, and easy installation. However, laying vinyl floor tiles around a toilet can be a bit challenging. In this comprehensive guide, we will walk you through each step of the process, ensuring that you achieve a professional-looking result. From preparing the floor to cutting the tiles and applying adhesive, we’ve got you covered.
Table of Contents:
1. Preparing the Floor
2. Measuring and Cutting the Tiles
3. Applying Adhesive and Laying the Tiles
4. Sealing the Edges and Reinstalling the Toilet
5. Frequently Asked Questions (FAQs)
1. Preparing the Floor:
Before you begin laying vinyl floor tiles around your toilet, it is crucial to ensure that the floor is clean, dry, and smooth. Follow these steps for optimal preparation:
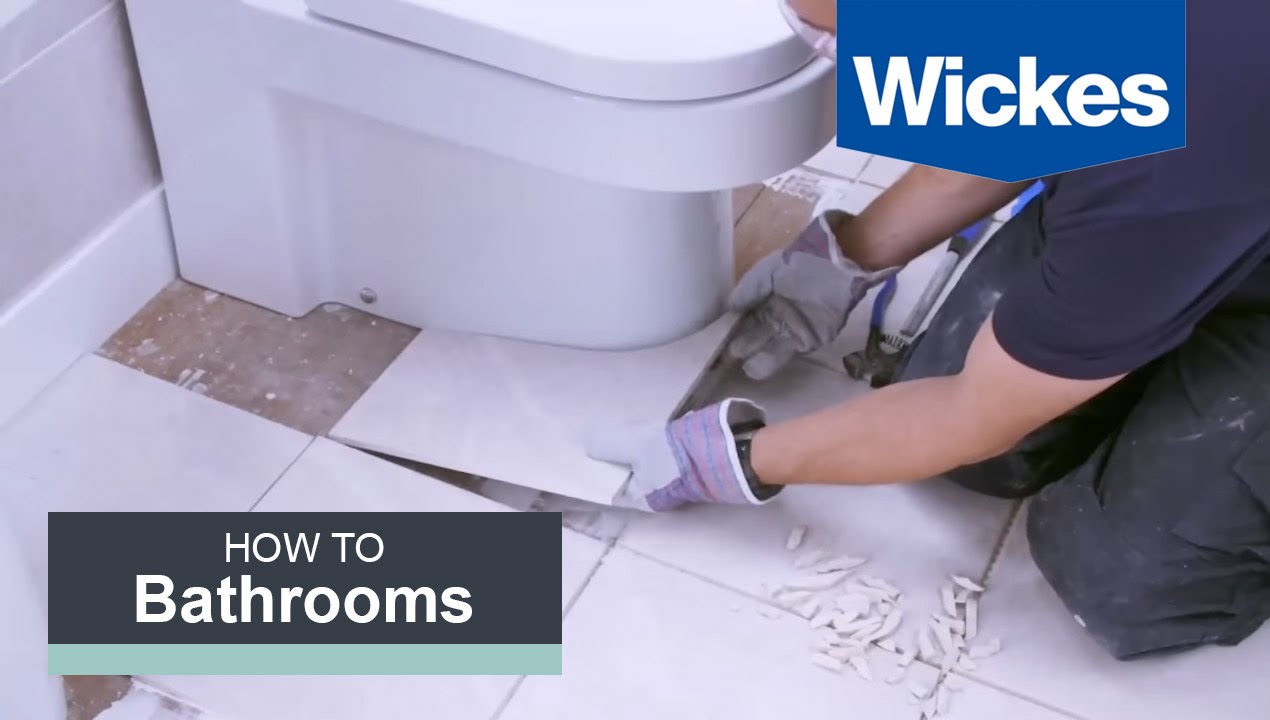
a) Remove Old Flooring: If you have existing flooring in place, such as ceramic tiles or linoleum, it must be removed before proceeding with vinyl tile installation. Use a pry bar or scraper to lift the old flooring carefully.
b) Clean and Level the Subfloor: Thoroughly clean any debris or adhesive residue from the subfloor using a broom and vacuum cleaner. Ensure that the subfloor is level by filling any low spots with leveling compound or sanding down high areas.
c) Protect Against Moisture: Apply a moisture barrier if your bathroom tends to have high levels of humidity or if you are installing over a concrete subfloor.
2. Measuring and Cutting the Tiles:
Accurate measurements are essential when cutting vinyl floor tiles around a toilet. Follow these steps to measure and cut your tiles:
a) Measure the Space: Use a tape measure to determine the length and width of the space where you will be laying your vinyl tiles. Consider leaving a small gap around the edges to allow for expansion.
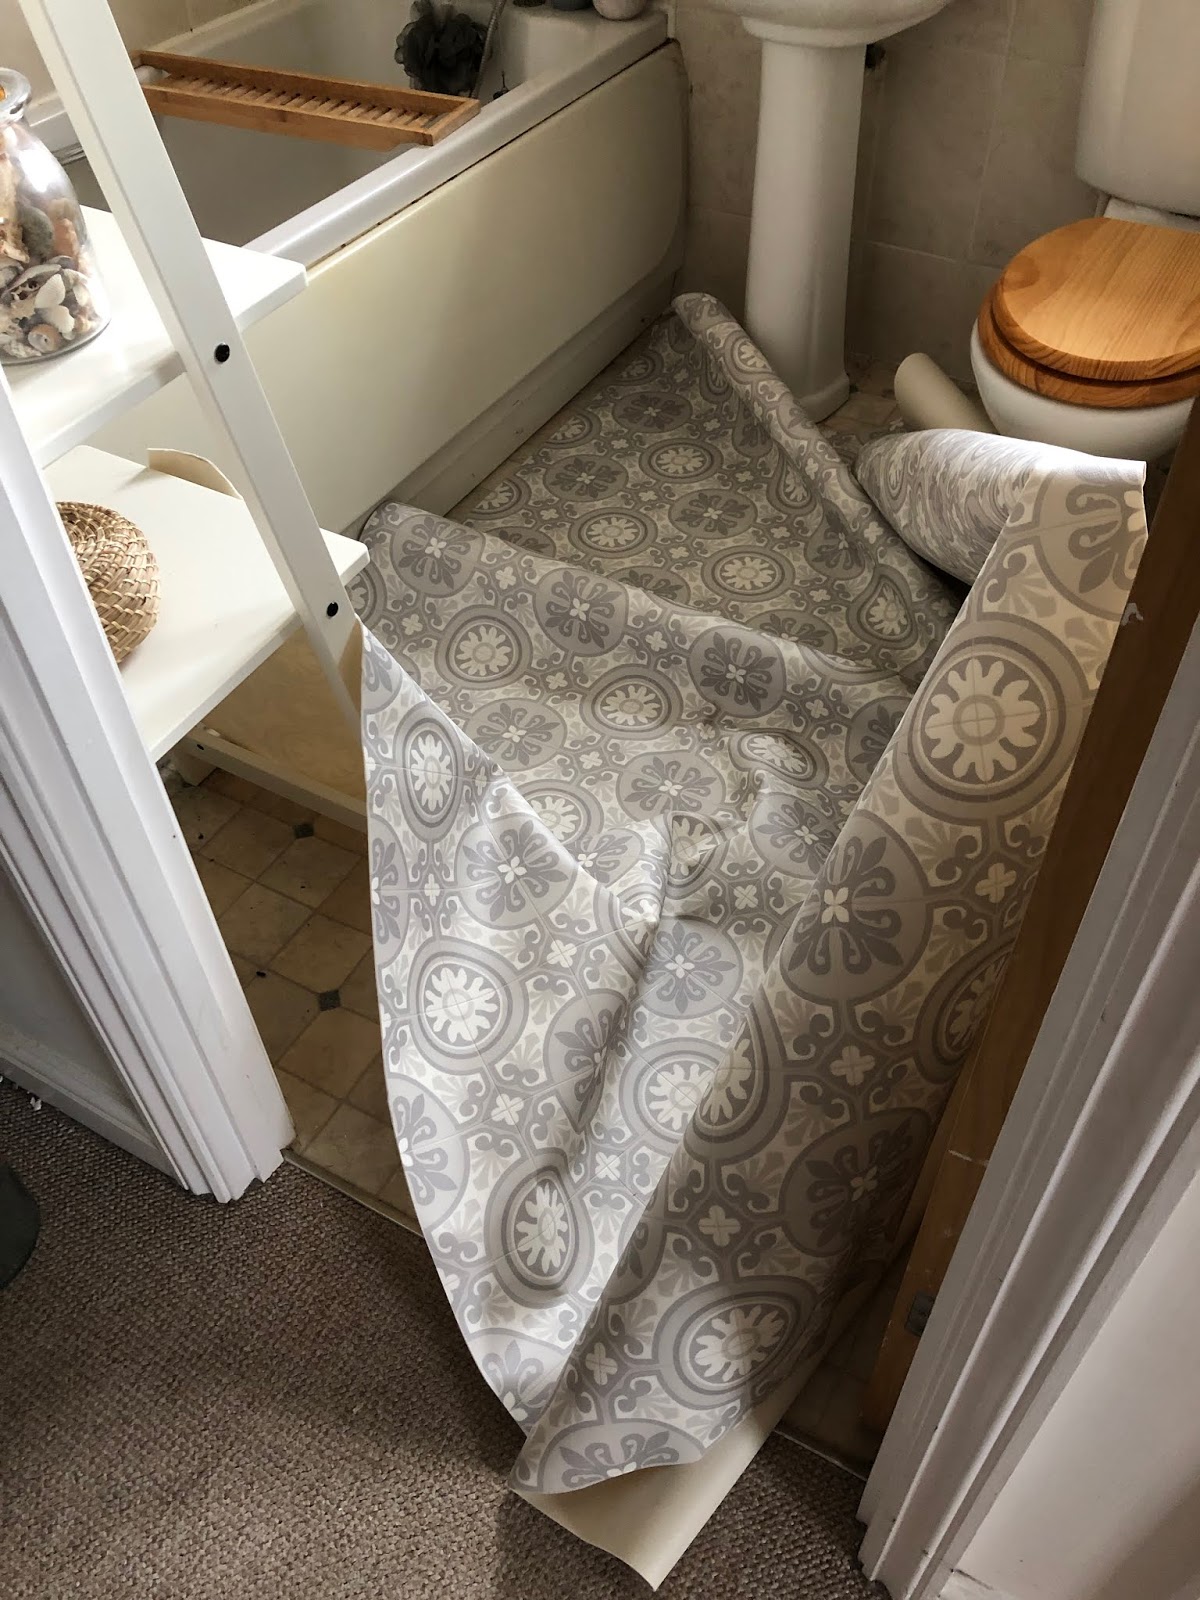
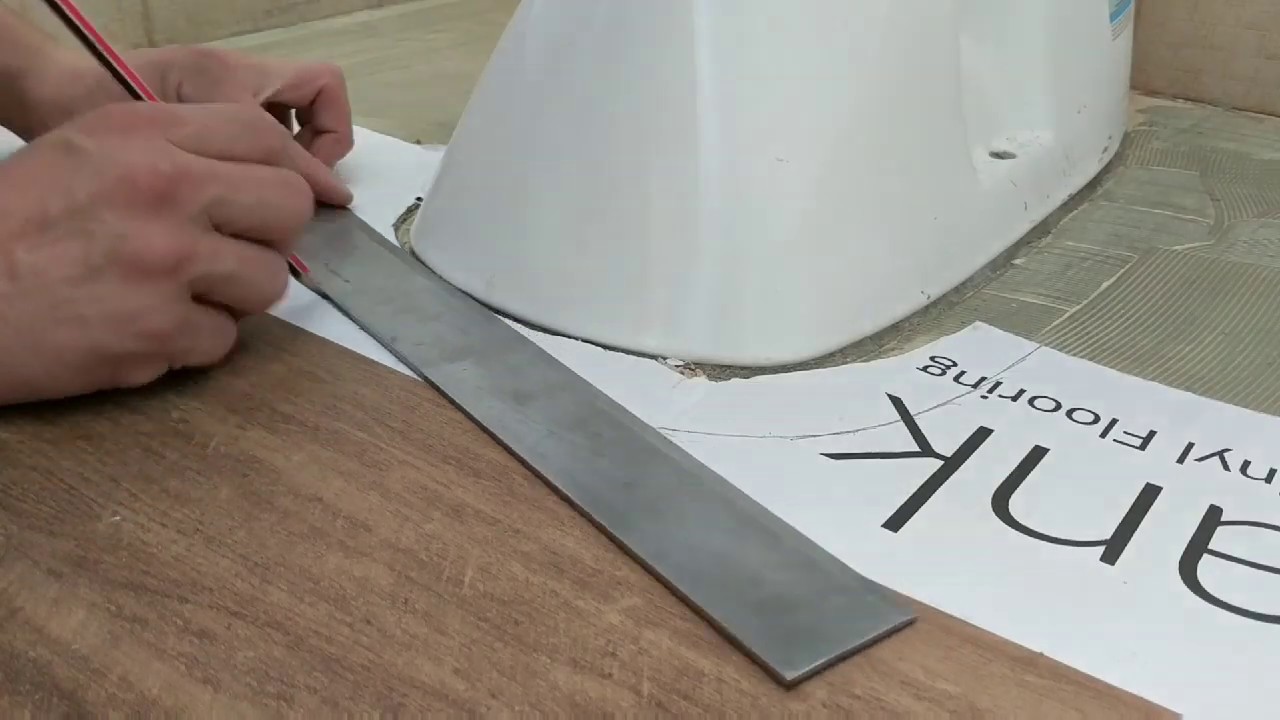
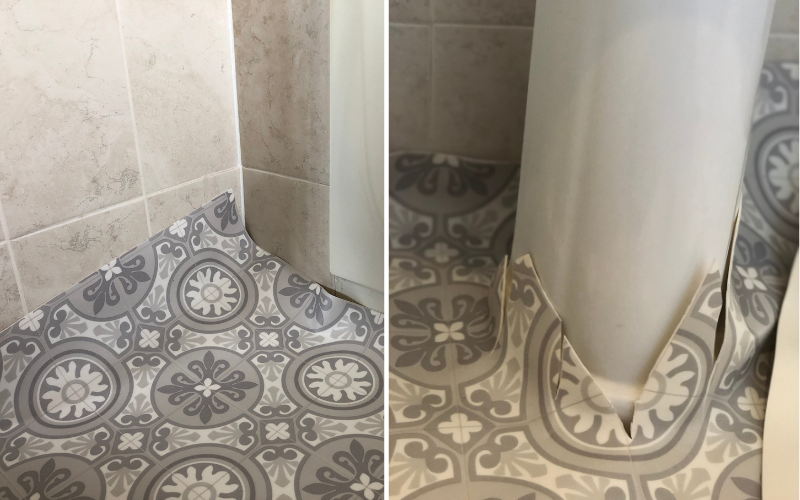
b) Create a Template: To ensure precise cuts, create a template using paper or cardboard. Place the template on the floor, ensuring it fits snugly around the toilet base.
c) Transfer Measurements to Tiles: Using your template, transfer the measurements onto your vinyl tiles. Use a straight edge and a utility knife to make clean, accurate cuts.
d) Test Fit the Tiles: Before applying adhesive, test fit the tiles around the toilet base to ensure they fit correctly. Make any necessary adjustments before moving on to the next step.
3. Applying Adhesive and Laying the Tiles:
Now that you have prepared the floor and cut your vinyl tiles, it’s time to lay them down using adhesive:
a) Choose an Adhesive: Select a suitable adhesive specifically designed for vinyl floor tiles. Follow the manufacturer’s instructions for application and drying times.
b) Apply Adhesive: Starting from the center of the room, apply adhesive to a small section of the subfloor using a notched trowel. Work in manageable sections to prevent the adhesive from drying out before you lay the tiles.
c) Lay Tiles: Carefully place each tile onto the adhesive, aligning them with your desired pattern. Press firmly on each tile to ensure proper adhesion and remove any air bubbles. Continue applying adhesive and laying tiles until you have covered the entire area.
4. Sealing the Edges and Reinstalling the Toilet:
To complete your vinyl floor tile installation around a toilet, follow these Steps:
a) Seal the Edges: After the tiles have been laid and the adhesive has dried, apply a silicone caulk along the edges of the tiles to create a waterproof seal. This will help prevent moisture from seeping underneath the tiles.
b) Reinstall the Toilet: Once the caulk has dried, carefully reinstall the toilet over the vinyl tiles. Follow proper installation techniques and ensure a tight seal between the toilet base and the floor.
c) Test for Leaks: Turn on the water supply to the toilet and flush it to check for any leaks. If you notice any leaks, tighten the connections or seek professional assistance.
d) Clean and Maintain: Regularly clean your vinyl floor tiles using a mild cleaner and a damp mop. Avoid using harsh chemicals or abrasive tools that could damage the tiles.
By following these steps, you can successfully install vinyl floor tiles around a toilet in your bathroom. Remember to take accurate measurements, use proper adhesive, seal the edges, and reinstall the toilet correctly. Installing vinyl floor tiles around a toilet can be done by following these steps:
1. Prepare the Floor:
a) Remove the old flooring: Start by removing any existing flooring around the toilet, ensuring that the subfloor is clean and free from debris.
b) Measure and create a template: Measure the area around the toilet base and create a template using cardboard or paper. Ensure that it fits snugly around the toilet base.
c) Transfer Measurements to Tiles: Using your template, transfer the measurements onto your vinyl tiles. Use a straight edge and a utility knife to make clean, accurate cuts.
d) Test Fit the Tiles: Before applying adhesive, test fit the tiles around the toilet base to ensure they fit correctly. Make any necessary adjustments before moving on to the next step.
2. Applying Adhesive and Laying the Tiles:
a) Choose an Adhesive: Select a suitable adhesive specifically designed for vinyl floor tiles. Follow the manufacturer’s instructions for application and drying times.
b) Apply Adhesive: Starting from the center of the room, apply adhesive to a small section of the subfloor using a notched trowel. Work in manageable sections to prevent the adhesive from drying out before you lay the tiles.
c) Lay Tiles: Carefully place each tile onto the adhesive, aligning them with your desired pattern. Press firmly on each tile to ensure proper adhesion and remove any air bubbles. Continue applying adhesive and laying tiles until you have covered the entire area.
3. Sealing the Edges and Reinstalling the Toilet:
a) Seal the Edges: After the tiles have been laid and the adhesive has dried, apply a silicone caulk along the edges of the tiles to create a waterproof seal. This will help prevent moisture from seeping underneath the tiles.
b) Reinstall the Toilet: Once the caulk has dried, carefully reinstall the toilet over the vinyl tiles. Follow proper installation techniques and ensure a tight seal between the toilet base and the floor.
c) Test for Leaks: Turn on the water supply to the toilet and flush it to check for any leaks. If you notice any leaks, tighten the connections or seek professional assistance.
d) Clean and Maintain: Regularly clean your vinyl floor tiles using a mild cleaner and a damp mop. Avoid using harsh chemicals or abrasive tools that could damage the tiles.
By following these steps, you can successfully install vinyl floor tiles around a toilet in your bathroom. Remember to take accurate measurements, use proper adhesive, seal the edges, and reinstall the toilet correctly.