When there is moisture seeping up from the basement floor of yours, you must call a pro to take care of the problem – that will probably entail the installation of a vapor guard – just before at any time installing your floor. Not merely does the usage of several colors (contrasting colors available do ) which is great make the basement a custom look, though it hides the seams where the carpet tiles come together.
Images about How To Pour Concrete Basement Floor

It is vitally important to resolve the problems of your basement, whether you use it for storage or perhaps not. Although several other living areas in the home of yours could possibly be at first more vital for you, give consideration to what the most effective kind of basement floor is for your situation.
Pour Basement Concrete Slab For New Home icreatables.com

A few years ago folks started to recognize they'd a useful additional room that, while using application of several gyprock to the wall surfaces and ceiling, some form and some color of basement flooring, may be transformed into an additional family room or perhaps rooms. Take the time of yours and learn precisely what you need to accomplish to fix your floor.
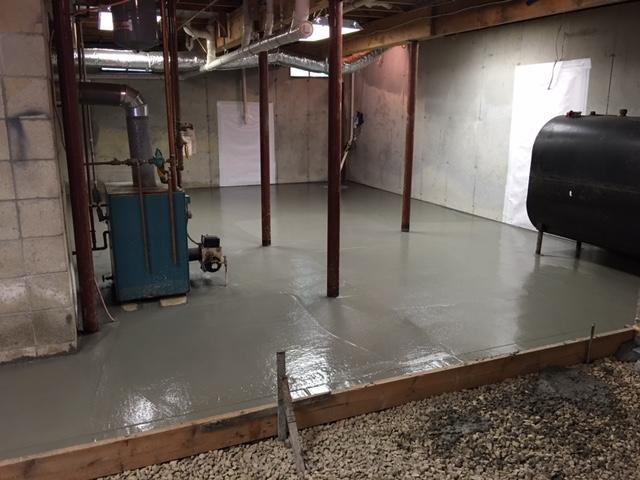
Basement floor poured u0026 garage footers! 9 15 16

Pouring the Basement Slab – YouTube

Fixing a Concrete Basement Floor American Dry

pouring basement floor 2017

how to pour a concrete basement floor Archives – Maple Concrete

Pouring A New Basement Concrete Floor 32u0027 x 32u0027 (New Home)

Basement Waterproofing – Waterproofing and Floor Pour in Rehoboth
How to Remodel a Dirt Basement Floor DoItYourself.com
Dropping the Level of a Basement Floor JLC Online

Construction Update: Pouring the New Basement Floor Green u0026 Main

Fixing a Concrete Basement Floor American Dry
Are cracks in a newly poured concrete basement floor a problem

Related Posts:
- Leveling A Concrete Basement Floor
- How To Snake A Basement Floor Drain
- Basement Flooring Products
- Cheap Tile For Basement Floor
- Mike Holmes Basement Flooring Options
- Is Vinyl Plank Flooring Good For Basements
- Paint Your Basement Floor
- How To Install Shower Drain In Basement Floor
- Basement Concrete Floor Paint Ideas
- White Powder On Basement Floor
How to Pour a Concrete Basement Floor: A Step-by-Step Guide
A concrete basement floor provides a solid foundation for your home or a functional space for various activities. Whether you’re finishing your basement or undertaking a new construction project, pouring a concrete floor is an essential step. This article will guide you through the process, from preparing the site to curing the concrete, ensuring you achieve a durable and flawless result.
Before You Begin: Gather the Necessary Tools and Materials
To pour a concrete basement floor, you’ll need several tools and materials. Gather these items before you start to ensure a smooth workflow:
1. Concrete mix: Choose a high-quality concrete mix suitable for basement applications. Opt for a mix that meets the requirements of your local building codes.
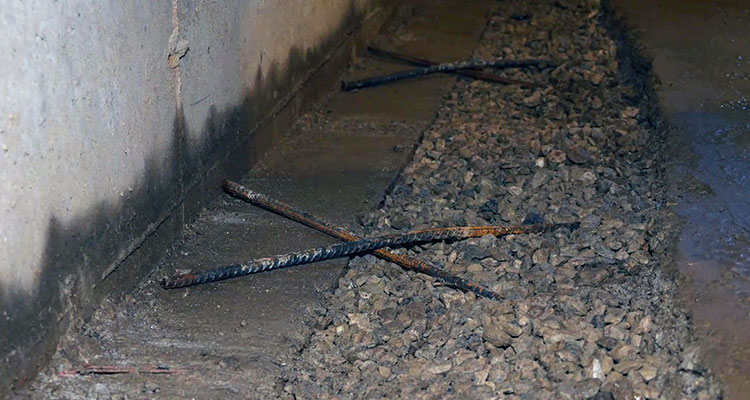
2. Reinforcement material: Depending on your project’s needs and local regulations, consider reinforcing the concrete with wire mesh or rebar.
3. Plastic sheeting: Lay plastic sheeting as a vapor barrier to prevent moisture from seeping through the concrete.
4. Sub-base material: Prepare the sub-base by adding gravel or crushed stone to ensure proper drainage and stability.
5. Wooden forms: Construct wooden forms along the perimeter of your basement to contain the poured concrete.
6. Concrete mixer or wheelbarrow: Use either a concrete mixer or wheelbarrow and shovel to mix the concrete thoroughly.
7. Bull float and trowel: These tools will help you level and finish the surface of the poured concrete.
8. Safety gear: Wear protective gear such as gloves, safety glasses, and knee pads while working with concrete.
Section 1: Preparing the Site
Before pouring the concrete, it’s crucial to prepare the site adequately. Follow these steps:
1. Clear out debris and level the ground: Remove any debris, rocks, or vegetation from the area where you’ll pour the floor. Level any uneven spots using fill dirt or compacted gravel.
2. Install the vapor barrier: Lay a plastic sheeting vapor barrier over the entire area to prevent moisture from seeping into the concrete. Overlap the sheets by several inches and tape them together securely.
3. Construct wooden forms: Use 2×4 lumber to build sturdy forms along the walls, ensuring they are level and square. Secure the forms in place with stakes or screws.
FAQ 1: How do I determine the correct thickness for my concrete basement floor?
The thickness of your basement floor depends on various factors, including load-bearing requirements, local building codes, and soil conditions. As a general guideline, a thickness of 4 inches is often sufficient for residential applications. However, it’s best to consult with a structural engineer or your local building department for precise recommendations based on your specific project.
Section 2: Mixing and Pouring the Concrete
Once the site is properly prepared, it’s time to mix and pour the concrete:
1. Calculate the required volume of concrete: Measure the length, width, and desired thickness of your basement floor to calculate the amount of concrete you’ll need. Use an online calculator or consult with a professional to determine the exact quantity.
2. Mix the concrete thoroughly: If using a concrete mixer, follow the manufacturer’s instructions to ensure proper mixing ratios. If using a wheelbarrow, combine one part cement, two parts sand, and three parts gravel on a clean surface. Gradually add water while mixing until you achieve a workable consistency.
3. Start pouring from one corner: Begin pouring the mixed Concrete into one corner of the basement, working your way towards the opposite corner. Use a shovel or concrete chute to guide the concrete into place within the wooden forms.
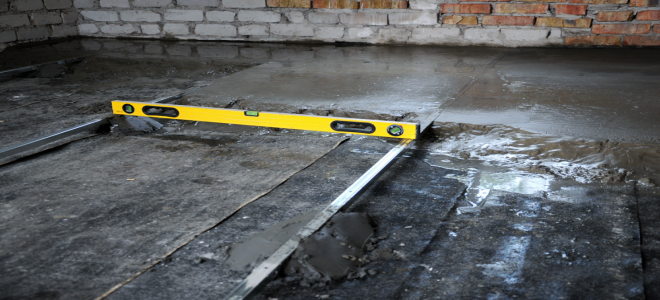
4. Spread and level the concrete: Use a bull float to spread the concrete evenly across the surface and level it. Move the bull float back and forth in a sweeping motion while applying slight pressure. If needed, use a hand trowel to smooth out any uneven areas or fill in low spots.
5. Finish the surface: Once the concrete has been leveled, you can use a trowel to create a smooth finish. Start by making small circular motions with the trowel, gradually increasing the size of your circles as you work your way across the floor. This will help to eliminate any visible lines or marks on the surface.
6. Allow time for curing: Concrete takes time to cure and harden properly. Follow the manufacturer’s instructions for curing time, which is typically around 7 days. During this time, it’s important to keep the concrete moist by covering it with plastic sheeting or using a curing compound.
FAQ 2: How long does it take for concrete to dry and be ready for use?
The drying time for concrete varies depending on factors such as temperature, humidity, and thickness of the slab. In general, it takes about 24-48 hours for concrete to dry enough that you can walk on it without damaging it. However, it can take up to 28 days for concrete to fully cure and reach its maximum strength.
Section 3: Finishing Touches
Once the concrete has cured, you can add finishing touches to your basement floor:
1. Apply a sealant: To protect your concrete floor from stains and moisture, apply a concrete sealant according to the manufacturer’s instructions. This will help prolong the lifespan of your basement floor and make it easier to clean.
2. Install flooring: If desired, you can install additional flooring materials over the concrete, such as carpet, laminate, or tile. Make sure to follow the manufacturer’s instructions for proper installation.
3. Add baseboards or trim: Install baseboards or trim along the edges of the basement floor to give it a finished look. Use construction adhesive or nails to secure the baseboards in place.
4. Clean up: Dispose of any leftover concrete properly and clean up any tools or equipment used during the process. Rinse off any concrete residue from surfaces using water and a stiff brush.