Porcelain is additionally a great decision for your bathroom flooring as it's regarded as impervious to moisture content. Nowadays, you will find a number of kinds of bath room floor vinyl tiles available. And anything you do to alter the style and decoration of a bathroom will considerably turn a space of that size. Gone are the period when bathroom floor vinyl meant boring patterns and no style.
Images about Painted Bathroom Floor Optical Illusion

If you go for ceramic tile you could consider an area rug for whenever you step out of the shower. Take the time of yours in shopping for floors for the bathroom of yours. If you're looking for a thing different go in for metal tiles. The two best options for the bathroom floors are tile vinyl or perhaps sheet and ceramic tiles.
Great 3d Bathroom Floor Optical Illusions – Optical Spy

If you get and install unglazed tiles, they will need to be cleaned often since they absorb stains quite easily. When choosing your floor it is important to be able to be within your budget, and to find something that you can deal with for a while, since replacing bath room floors isn't a thing that a lot people do on a regular basis.
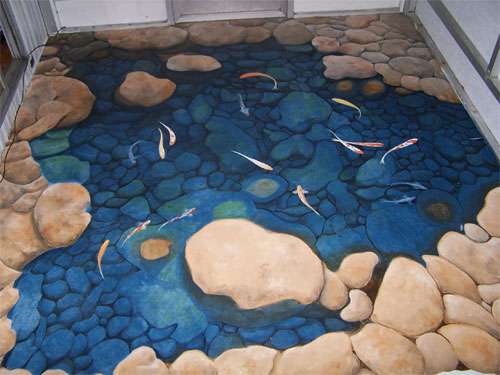
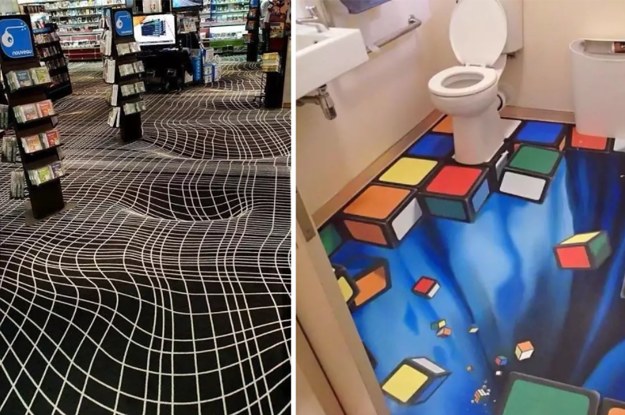
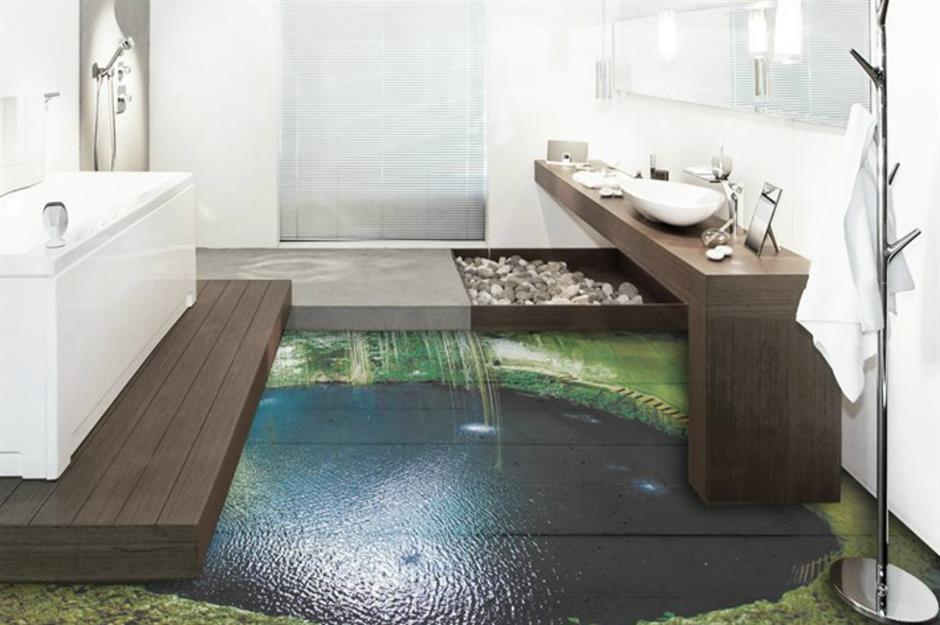
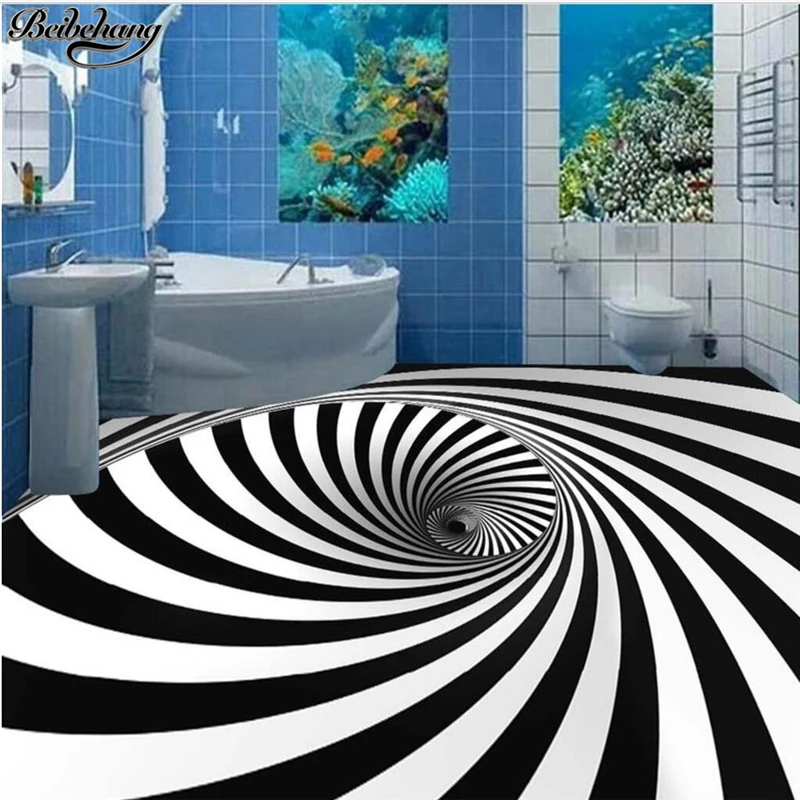
Amazing 3D Floors An Optical Illusion

This optical illusion bathroom floor – Imgur

3D Floor Murals: 10 Incredible Optical Illusion Designs to Floor
Mural optical illusion on the floor Glass floor, Bathroom design

These Floor Optical Illusions Are Basically A Drunk Personu0027s Worst
Look down! Statement floors that really make the room
Donu0027t fall in. Abyss on bathroom floor Floor murals, Mural

Optical Illusions That Are Tourist Attractions
beibehang Custom large 3D floor decoration painting height to cover black and white whirlpool illusion 3D stereo floor wallpaper
3 d Flooring Custom Waterproof Stair armrest Down Channel 3D

An Optical Illusion Tile System Designed by Casa Ceramica Colossal

Wait! Watch Your Step! OOZ u0026 OZ

Related Posts:
- Bathroom Floor Tile Patterns Ideas
- Black And White Bathroom Floor Designs
- Bathroom Epoxy Floor Coating
- Bathroom Floor Covering Options
- His And Hers Bathroom Floor Plans
- Dark Wood Tile Floor Bathroom
- Handicap Bathroom Floor Plans Commercial
- How To Clean Grout In Bathroom Floor
- Bathroom Flooring Wood Look
- Bathroom Floor Tile Layout 12×24
Title: Unleashing the Magic of Painted Bathroom Floor Optical Illusion
Introduction:
In today’s world, where creativity knows no bounds, homeowners are seeking unique and captivating ways to elevate their living spaces. One such mesmerizing trend is the painted bathroom floor optical illusion. This fascinating technique can transform an ordinary bathroom into a surreal haven, leaving guests in awe. In this article, we will delve into the intricacies of this art form, exploring its various designs, installation process, maintenance tips, and frequently asked questions.
I. The Art of Painted Bathroom Floor Optical Illusion
With the use of colors, patterns, and perspective tricks, painters create mind-bending optical illusions on bathroom floors that deceive the eye and challenge our perception of space. From three-dimensional effects that make a flat surface appear to have depth to illusions that imitate flowing water or pebbled paths, the options are endless.
One popular design is the faux-tile floor illusion. By meticulously painting geometric patterns resembling tiles on a smooth surface, artists can create an illusion of a tiled floor without the hassle and expense of actual tile installation. These designs can range from classic black and white checkered patterns to intricate mosaic-like arrangements.
II. Installation Process: Bringing Illusions to Life
1. Surface Preparation:
Before diving into the artistic process, it is crucial to prepare the bathroom floor correctly. Start by cleaning the surface thoroughly and ensuring there are no cracks or imperfections that could affect the illusion’s quality. Additionally, apply a primer suitable for your chosen paint type to enhance adhesion.
2. Design Planning:
Collaborate with professional painters or unleash your creativity by sketching out your desired design on paper or using digital software. Consider factors such as color schemes, patterns, and perspective angles to achieve maximum impact.
3. Paint Application:
Begin by applying a base coat in your chosen color to establish a solid foundation for your design. Once dry, carefully mark out the design elements using tape or stencils to ensure clean, precise lines. Proceed to layer colors and add shadows and highlights to create depth and realism.
4. Finishing Touches:
Allow the paint to dry completely before applying a protective sealant to safeguard your masterpiece against moisture and daily wear. This step is crucial for maintaining the illusion’s longevity and preserving its vibrant appearance.
III. Maintenance Tips: Preserving the Illusion’s Brilliance
1. Regular Cleaning:
To keep your painted bathroom floor optical illusion looking pristine, adopt a regular cleaning routine. Avoid abrasive cleaners or scrubbing brushes that could damage the paintwork. Instead, opt for gentle cleansers and soft cloths or mops.
2. Sealant Reapplication:
Over time, the protective sealant may wear off due to foot traffic and cleaning. To maintain the illusion’s durability, periodically reapply a fresh coat of sealant as recommended by the manufacturer.
3. Mindful Care:
While these illusions are designed to withstand typical bathroom usage, it is essential to take precautions to prevent accidental damage. Avoid dragging heavy objects across the floor, use rugs or mats in high-traffic areas, and ensure guests are aware of its delicate nature.
IV. Frequently Asked Questions:
1. Are painted bathroom floor optical illusions suitable for small bathrooms?
Absolutely! In fact, these illusions can work wonders in small spaces by creating an illusion of depth and expanding the perceived size of the room. By carefully selecting colors and patterns that complement your overall decor scheme, you can transform even The tiniest of bathrooms into a visually stunning space.
2. Can I create my own design, or should I hire a professional?
Both options are viable, depending on your artistic abilities and desired outcome. If you feel confident in your artistic skills and have a clear vision for your design, you can certainly create your own masterpiece. However, if you want a more complex or intricate design, or if you are unsure about the technical aspects of the process, it may be best to consult with a professional painter who specializes in optical illusions.
3. How long does it take to complete a painted bathroom floor optical illusion?
The time required for completion will depend on various factors, including the complexity of the design, the size of the bathroom floor, and the drying time between layers. On average, it can take several days to a week or more to complete the entire process. It is important to allocate enough time for each step and allow for proper drying and curing times to achieve the best results.
4. Can I use any type of paint for this project?
While there is some flexibility in paint selection, it is crucial to choose paints that are suitable for high-moisture environments such as bathrooms. Opt for durable, water-resistant paints specifically designed for floors or masonry surfaces. Consult with your local paint supplier or professional painter for recommendations on the best paint products to use.
5. Can I remove the painted illusion if I decide I no longer want it?
Removing a painted bathroom floor optical illusion can be challenging and may require professional assistance. It typically involves sanding or stripping off multiple layers of paint and may result in damage to the underlying floor surface. Therefore, it is important to carefully consider your decision before embarking on this project to ensure it is a long-term commitment.
Remember, creating a painted bathroom floor optical illusion requires careful planning, attention to detail, and patience. By following the installation process and implementing proper maintenance techniques, you can enjoy a unique and visually captivating bathroom experience for years to come.