A spot remover exclusively formulated for concrete floor, like those sold at expert janitorial supply companies, can assist you. In contrast, a polished concrete floors, which is highly resistant to scuffs and stains, can be simply mopped when needed. The finished effect is definitely a uniform surface, joints are slightly noticeable.
Images about How To Lay Ceramic Tile On A Concrete Floor

Each time you are going to undertake maintenance job for the polished concrete floors of yours, you require spending merely a portion of money as compared to other flooring we have choices. In domestic ways polished concrete floors are actually selected for its good looks, but in industrial situations it is recommended because of practicality; these floor surfaces are also very functional.
How to Prepare for Laying Tile Over a Concrete Floor

Concrete floors could be scored to generate a pattern by opting for superficial cuts having a circular saw. With all this features concrete floorings are actually becoming rather popular day by majority of people as well as day are actually opting for the same.
How to Install Ceramic Tile Flooring in 9 Steps – This Old House
:no_upscale()/cdn.vox-cdn.com/uploads/chorus_asset/file/19496947/color_gutters_illo_web_1.jpg)
How to Prepare Concrete for a Tile InstallationLearning Center

Can You Install Tile Over Concrete?
:max_bytes(150000):strip_icc()/can-you-install-tile-directly-on-concrete-1822600-04-458f7bb6c78348c1835cf8054ef36553.jpg)
DIY! Laying Porcelain Tile on a Concrete Porch – YouTube
How to Lay Tile on Concrete (with Pictures) – wikiHow

How to tile a concrete floor – How to Build, Step by Step DIY Plans

How To Install Ceramic Tiles On Concrete Floor ? – Ceramic Tile
Tile Floor 101 Step by Step How to Install Tile for the First Time

How to Install Ceramic Tile Flooring in 9 Steps – This Old House
:no_upscale()/cdn.vox-cdn.com/uploads/chorus_asset/file/19496978/howto_tile_01.jpg)
Floor Tile Installation Methods – Tile Doctor

How to Install ceramic tile on concrete using thinset mortar
How to Lay Tile: Install a Ceramic Tile Floor In the Bathroom (DIY)

Related Posts:
- Behr Epoxy Concrete Floor Paint
- Concrete Floor Preparation For Wood Flooring
- Epoxy Paint For Concrete Floors Colors
- Rent Concrete Floor Cleaner
- Heated Concrete Floor Tubing
- Concrete Floor Staining Process
- Concrete Floor Interior Design
- Concrete Floors In Your Home
- Cost Of Poured Concrete Floor
- Outdoor Polished Concrete Floors
Title: How to Expertly Lay Ceramic Tile on a Concrete Floor
Introduction:
Laying ceramic tile on a concrete floor can transform the appearance and functionality of any space. Whether you’re renovating your kitchen, bathroom, or any other room, this comprehensive guide will walk you through the step-by-step process of laying ceramic tile on a concrete floor. From preparing the surface to grouting and sealing, we’ll cover everything you need to know to achieve professional-looking results.
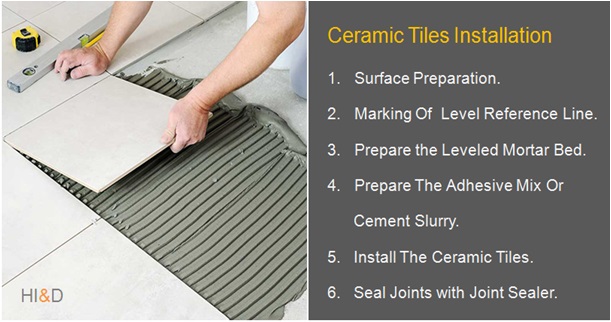
I. Preparing the Concrete Surface:
Before you begin tiling, it is crucial to properly prepare the concrete surface to ensure a long-lasting installation. Follow these steps for optimal results:
1. Clean and Repair:
Start by thoroughly cleaning the concrete floor, removing any debris, dirt, or grease. Use a stiff brush and a mild detergent solution to scrub the surface. Once clean, inspect for cracks or uneven areas. Fill cracks with a high-quality crack filler and level uneven spots using a leveling compound.
2. Etching:
To enhance adhesion between the concrete and tile adhesive, consider etching the surface using an etching solution or muriatic acid diluted in water according to manufacturer instructions. Apply the solution evenly with a mop or brush, let it sit for the recommended time, then rinse thoroughly with water.
3. Moisture Testing:
Concrete floors must be adequately dry before tile installation to prevent future problems such as mold or tile detachment. Perform a moisture test using a moisture meter or plastic sheet test to ensure moisture levels are within acceptable limits.
FAQs:
Q1: Can I install ceramic tiles directly on a freshly poured concrete floor?
A1: It is not recommended to install tiles on freshly poured concrete as it needs time to cure properly. Wait at least 28 days before proceeding with tile installation.
Q2: Do I need to remove old adhesive from my concrete floor before tiling?
A2: Yes, it is essential to remove any old adhesive or residue from previous flooring installations. This can be done using a floor scraper or grinding machine.
II. Planning and Layout:
Proper planning and layout are crucial for achieving a visually appealing result. Here’s what you need to do:
1. Measure and Mark:
Start by measuring the room’s dimensions accurately and calculating the square footage of the space. Use these measurements to determine the number of tiles needed. Begin from the center of the room and mark reference lines using a chalk snap line, dividing the floor into four quadrants.
2. Dry Layout:
Before applying adhesive, conduct a dry layout by placing loose tiles along the reference lines. This will help you visualize any necessary adjustments in tile size or layout pattern to ensure symmetry and avoid small, awkward cuts.
3. Cutting Tiles:
When planning your layout, take into account areas that will require cut tiles. Measure these areas precisely, allowing for grout spacing, and use a tile cutter or wet saw to make accurate cuts.
FAQs:
Q1: What is the recommended grout spacing for ceramic tiles?
A1: The standard grout spacing for ceramic tiles is 1/8 inch (3 mm). However, larger tiles may require wider spacing to accommodate slight size variations.
Q2: Can I use regular cutting tools like a utility knife to cut ceramic tiles?
A2: No, it is advisable to use specialized tile cutting tools such as a tile cutter or wet saw for precise and clean cuts.
III. Applying Tile Adhesive:
Now that your concrete surface is prepared And your layout is planned, it’s time to apply the tile adhesive. Follow these steps:
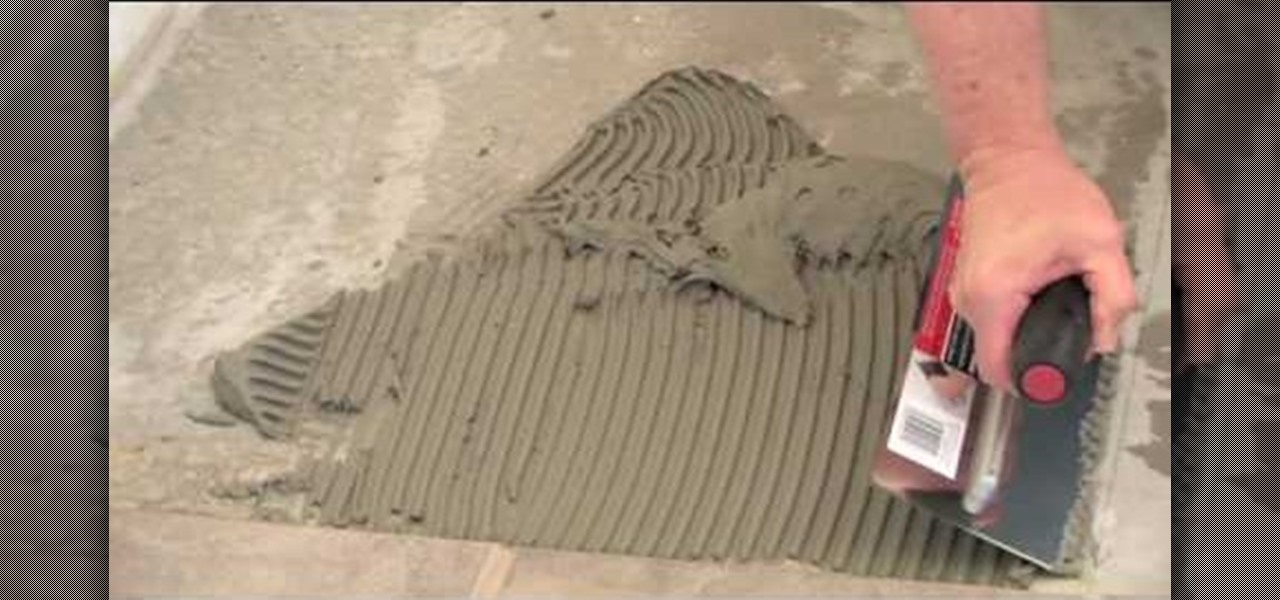
1. Choose the Right Adhesive:
Select a tile adhesive suitable for your specific tile type and the area of installation (e.g., thinset mortar for ceramic tiles). Follow the manufacturer’s instructions regarding adhesive mixing and application.
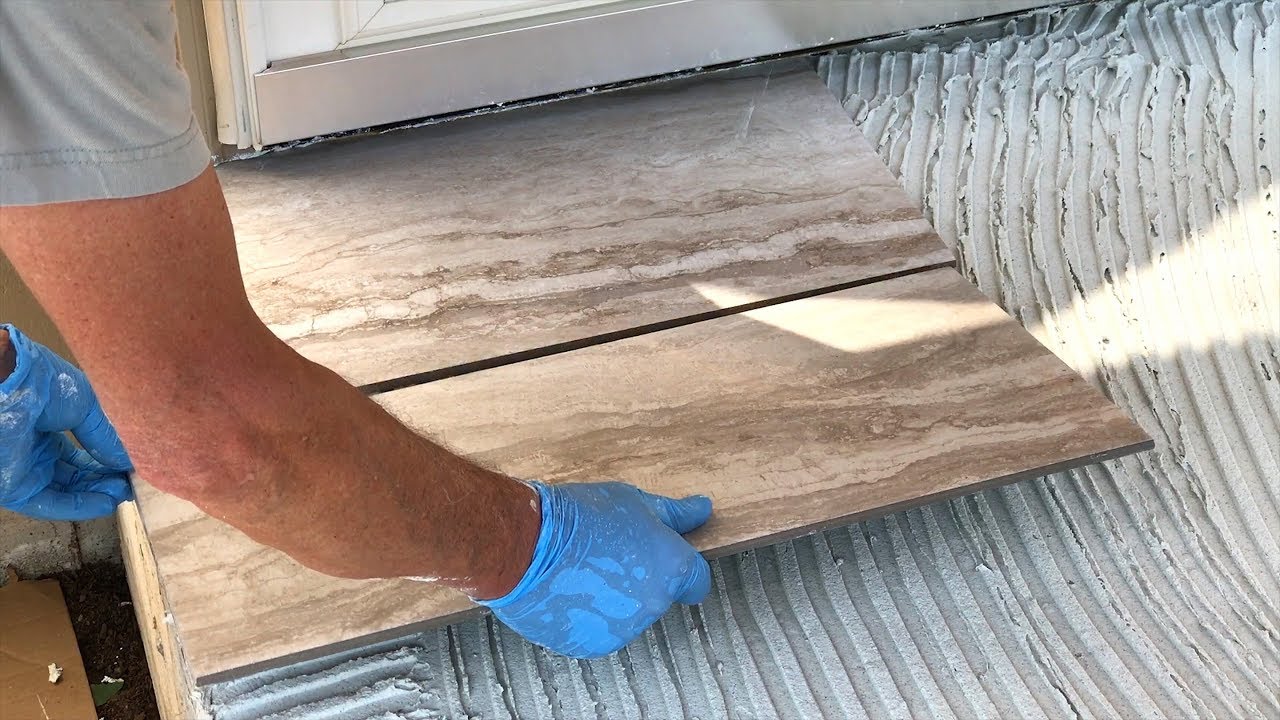
2. Apply the Adhesive:
Starting from one quadrant, use a notched trowel to spread a layer of adhesive onto the concrete surface. Work in small sections to prevent the adhesive from drying before you can lay the tiles.
3. Comb the Adhesive:
After applying the adhesive, use the notched side of the trowel to create grooves in the adhesive. This helps ensure proper adhesion and allows for better air release during tile installation.
4. Lay the Tiles:
Place each tile firmly into the adhesive, pressing down and wiggling it slightly to ensure good contact. Use tile spacers to maintain consistent grout spacing between tiles. Continue laying tiles in small sections, following your planned layout.
FAQs:
Q1: How long should I wait before grouting after applying tile adhesive?
A1: The waiting time before grouting varies depending on the type of adhesive used. Refer to the manufacturer’s instructions for recommended drying or curing times.
Q2: Can I adjust or remove tiles after they are set in adhesive?
A2: It is best to make any adjustments or tile removals while the adhesive is still wet and workable. Once it has dried, removing or adjusting tiles can be difficult and may lead to damage.
IV. Grouting:
Grouting is the final step in the tile installation process. Follow these guidelines:
1. Choose the Right Grout:
Select a grout color that complements your tiles and meets your desired aesthetic. Ensure you choose a grout suitable for your specific tile type and joint width. Follow the manufacturer’s instructions for mixing the grout.
2. Apply the Grout:
Using a rubber grout float, apply the grout mixture diagonally across the tile joints, pressing it into the gaps. Work in small sections to prevent the grout from drying too quickly.
3. Remove Excess Grout:
After applying the grout, use a damp sponge or cloth to remove excess grout from the tile surfaces. Rinse the sponge frequently and avoid applying too much pressure to prevent removing too much grout from between the tiles.
4. Seal the Grout (Optional):
To protect the grout from stains and moisture penetration, consider applying a grout sealer once it has fully cured according to the manufacturer’s instructions.
FAQs:
Q1: How long should I wait before sealing the grout?
A1: The waiting time before sealing the grout varies depending on the type of grout used. Refer to the manufacturer’s instructions for recommended curing times before applying a sealer.
Q2: Can I walk on tiled floors immediately after grouting?